Admin Portal - Credentials
Note
Required fields are indicated with a red Asterisk.
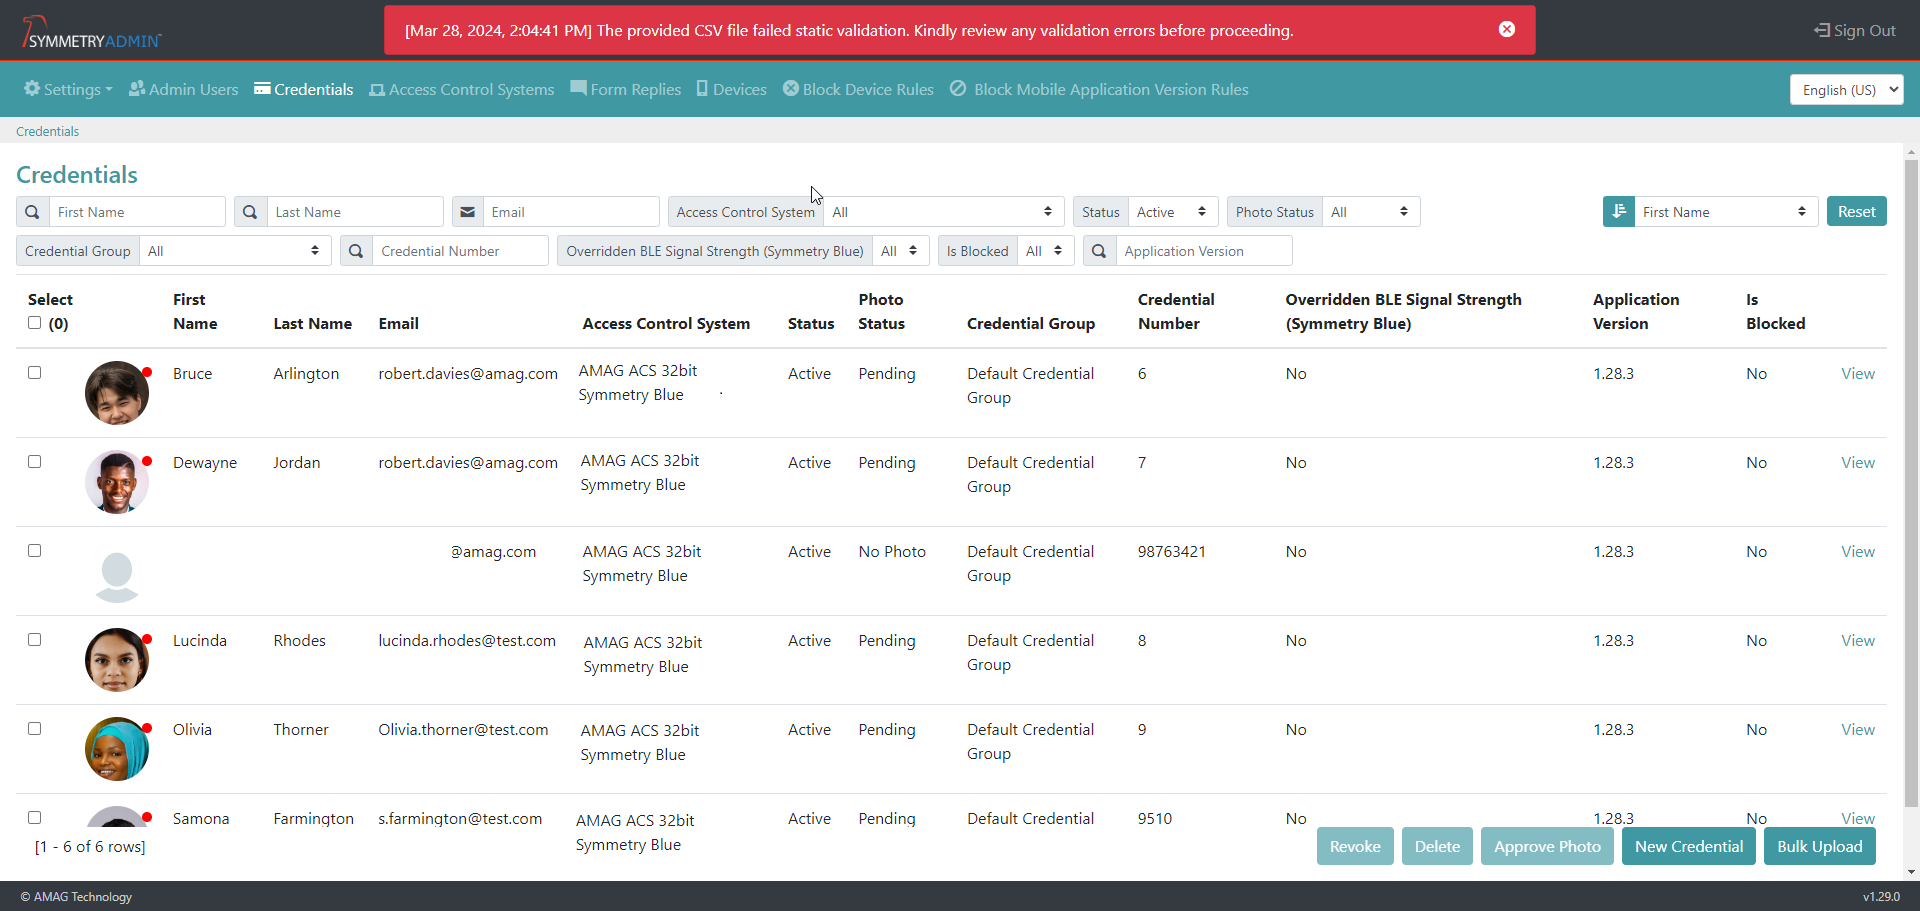
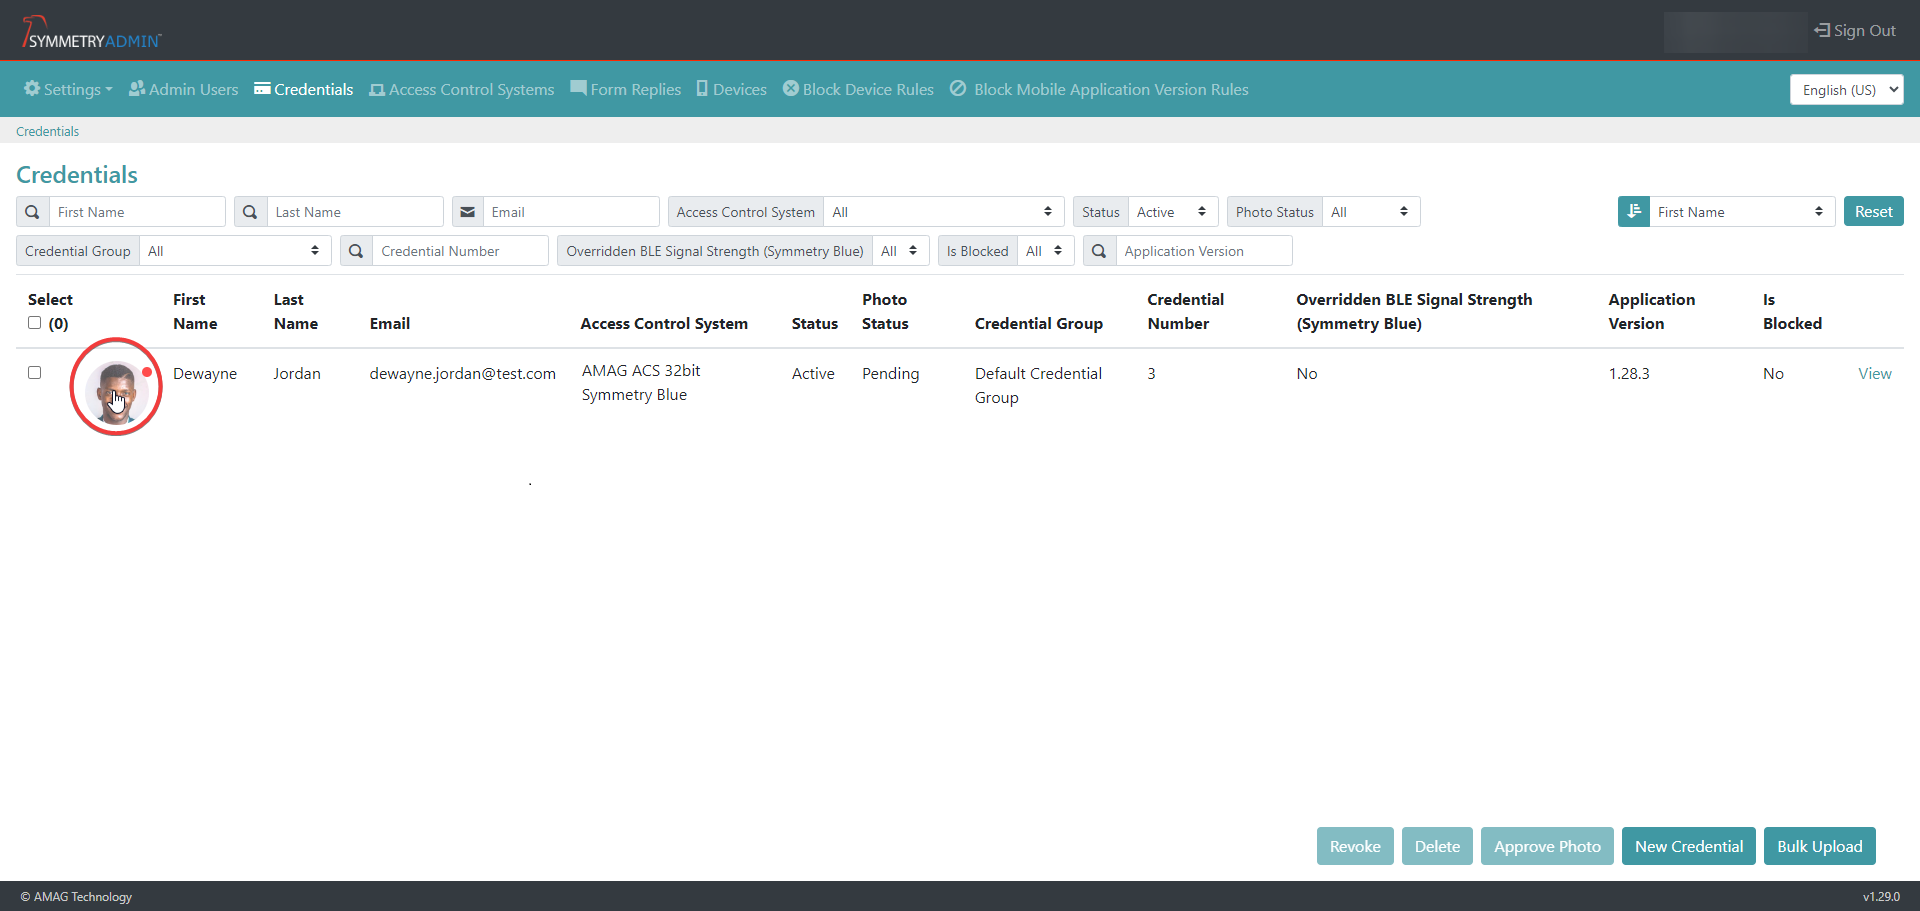
The Admin Portal > Credentials section allows the user to create new credentials and edit existing credentials. The user can also approve credential photos, revoke or delete a credentials.
Existing credentials show the the photo assigned to the credential. If no photo has been assigned a default placeholder image will be used.
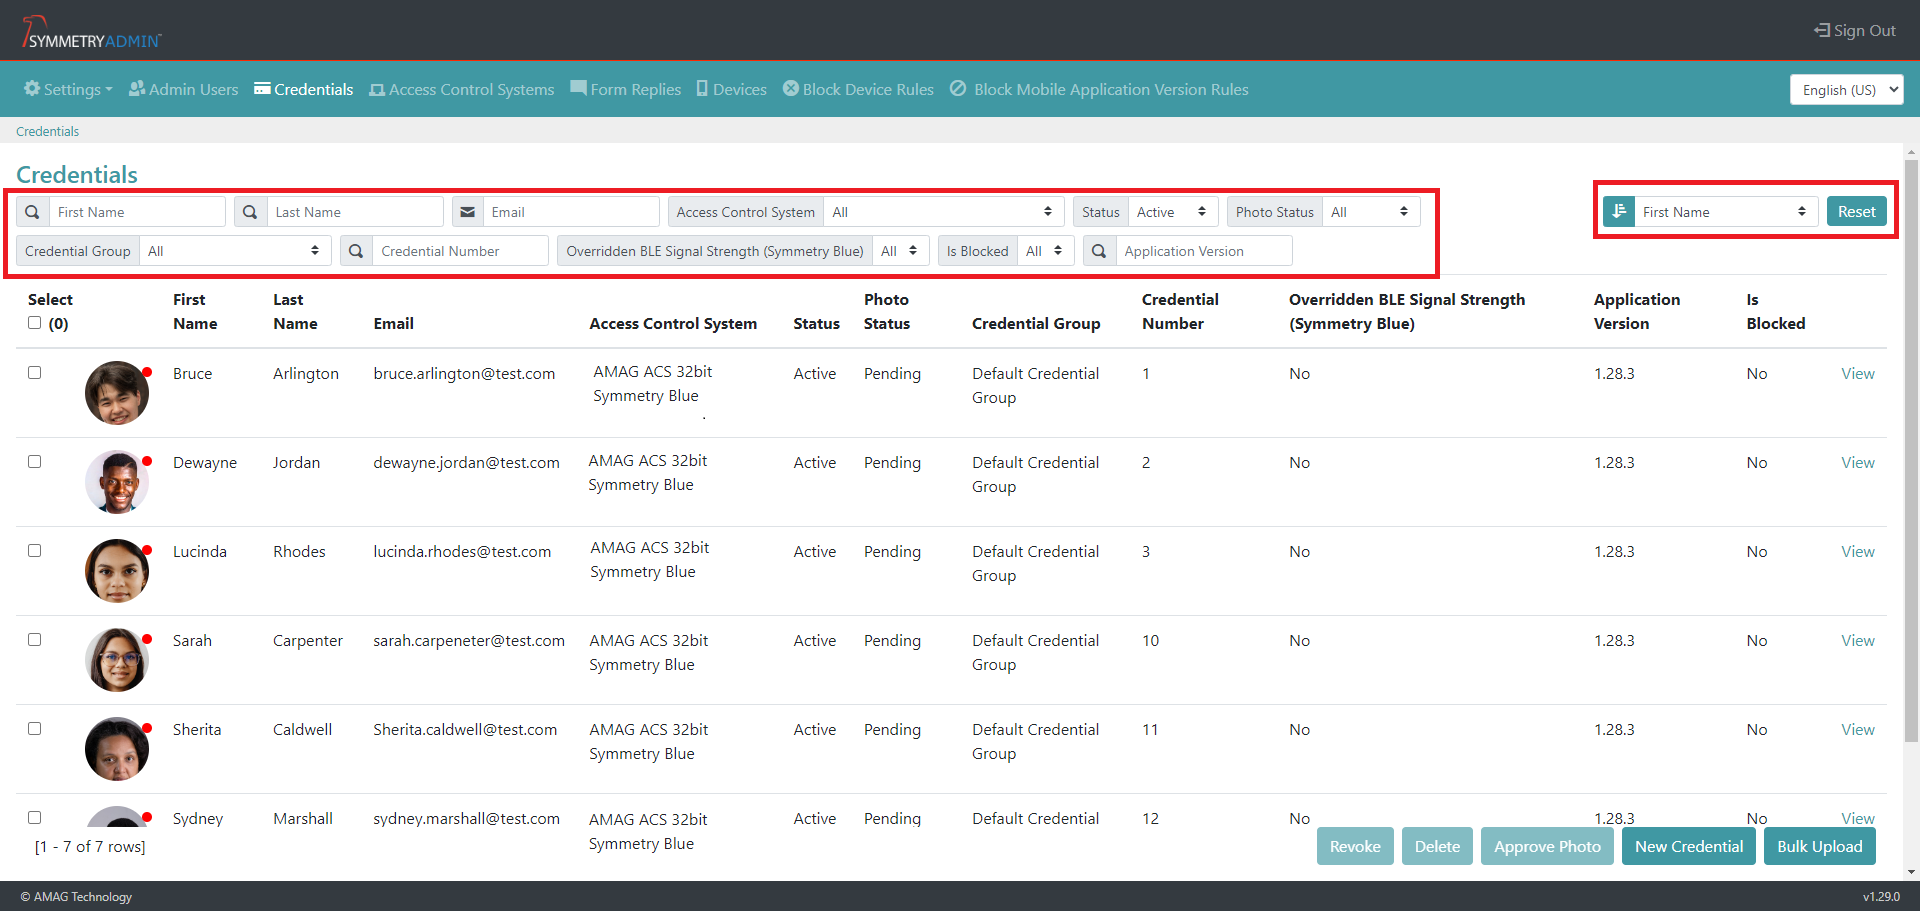
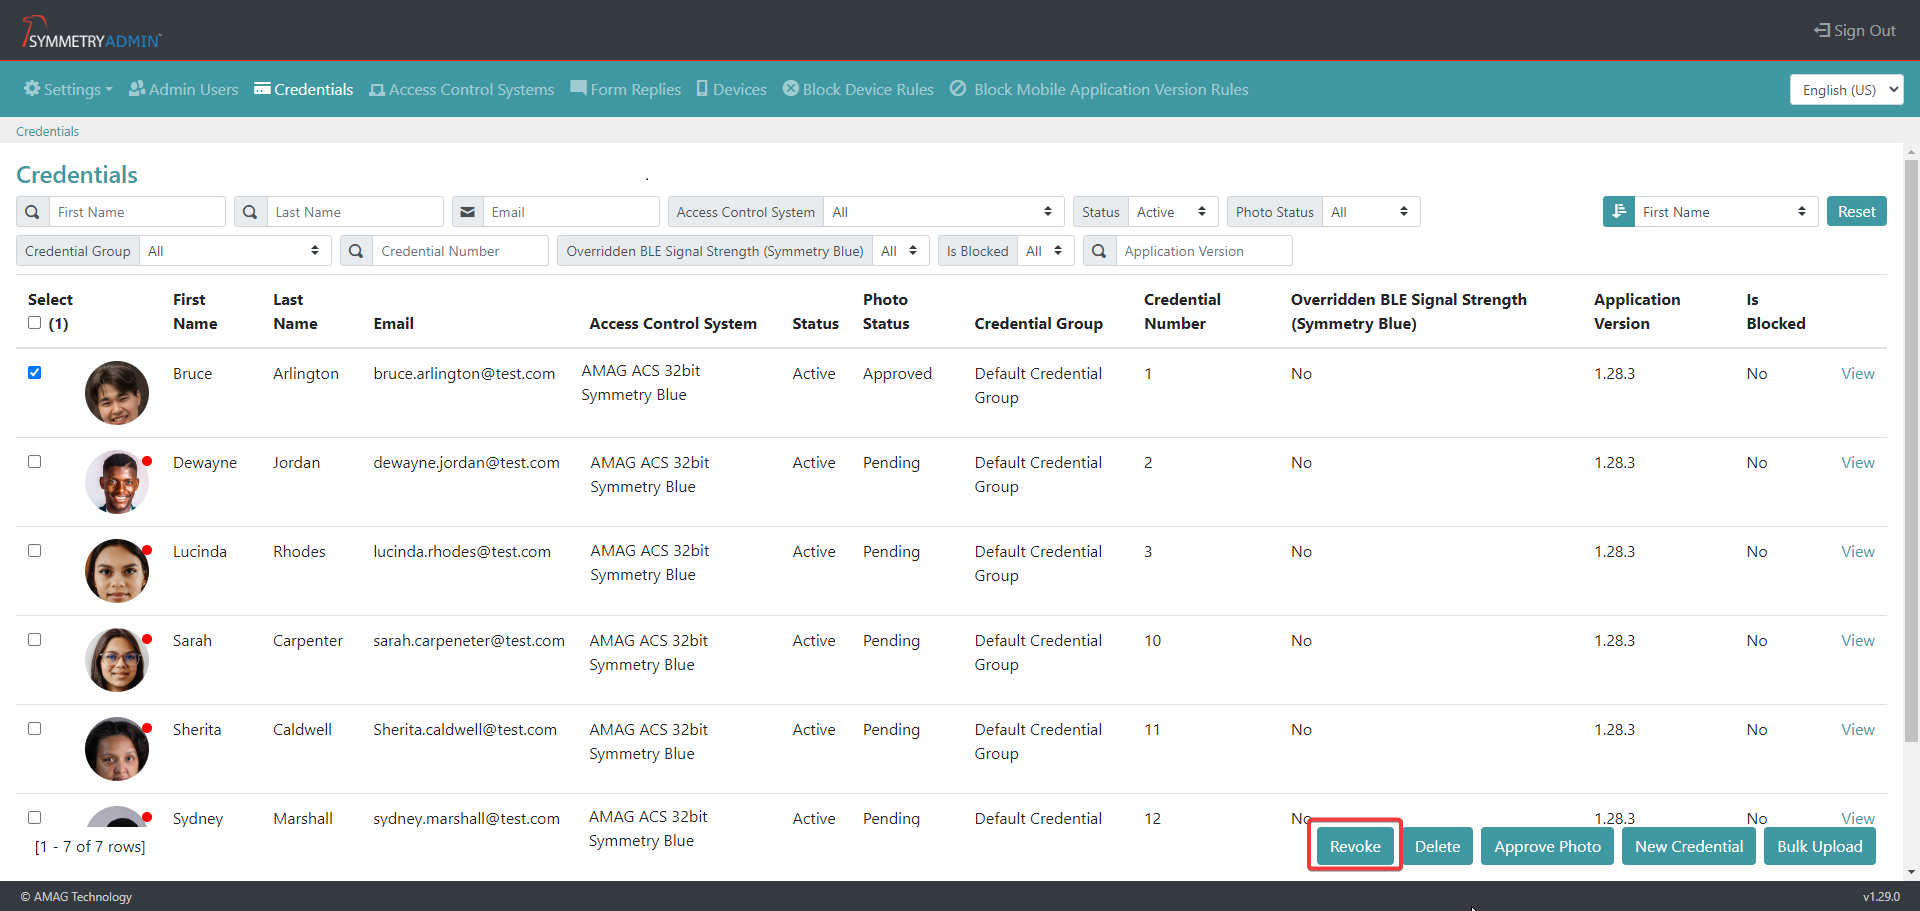
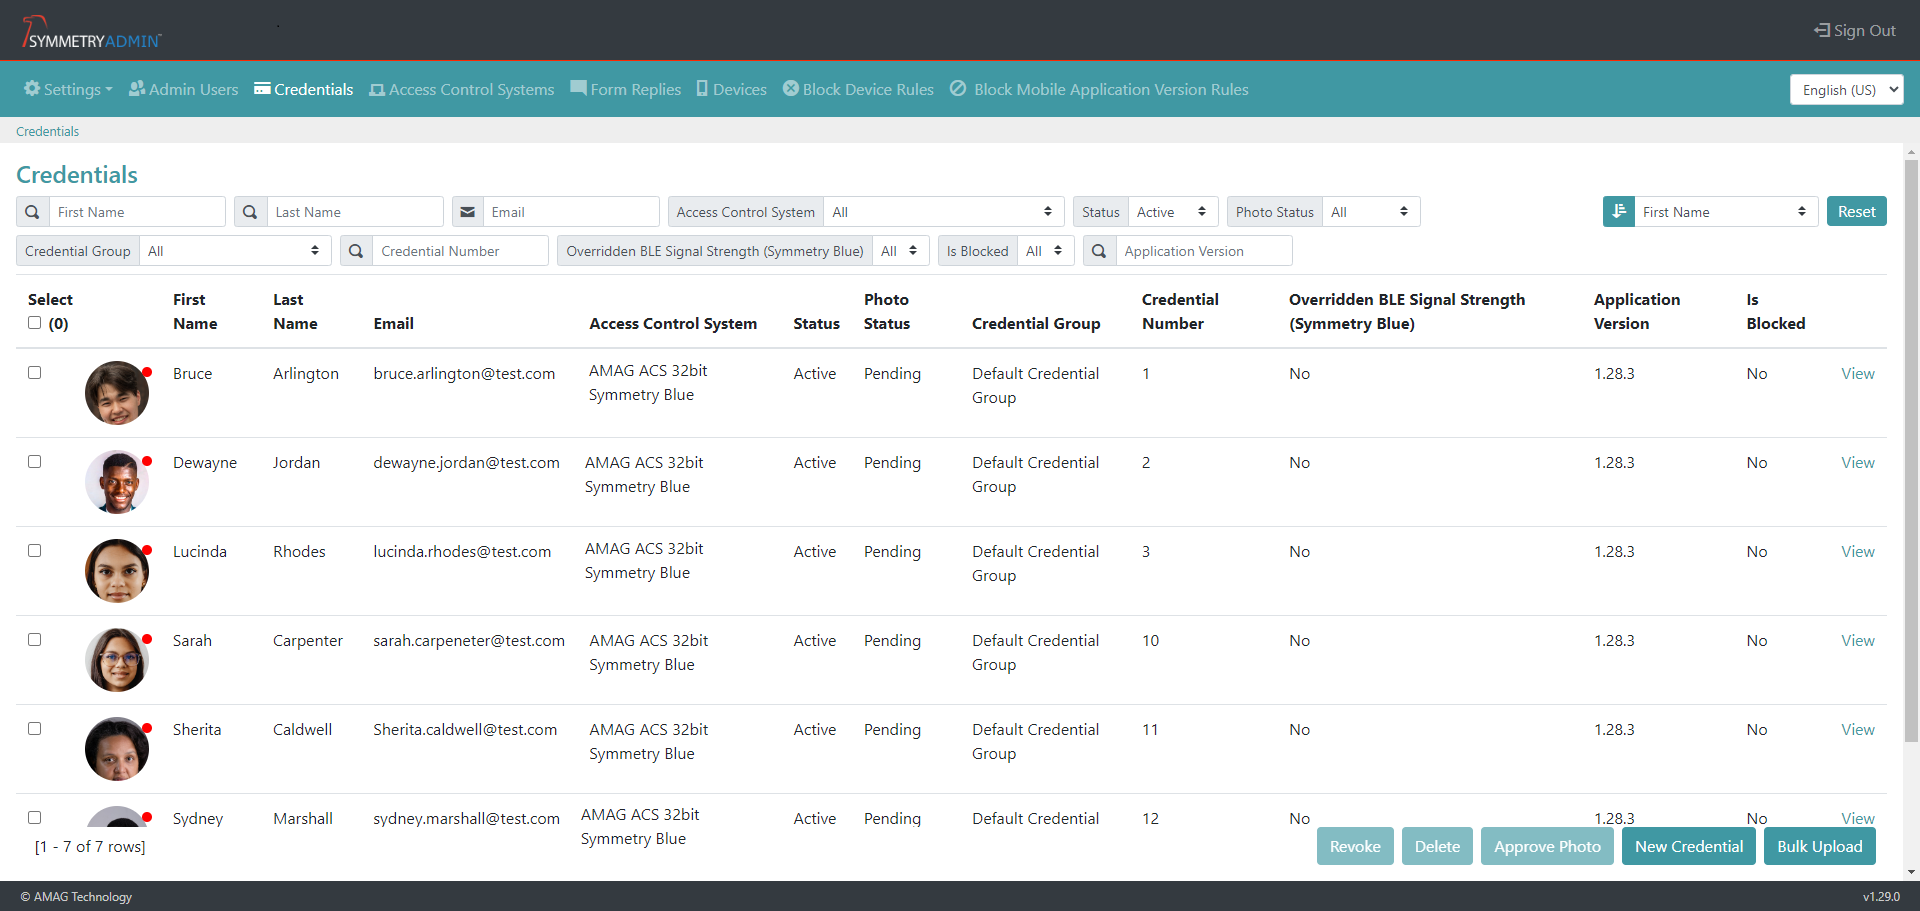
The user can search for existing credentials using the filter tabs at the top of the screen, the options available are:
First Name: The first name of the credential
Last Name: The last name of the credential
Email: The email address associated with the credential
Access Control System: The access control system the credential is associated with
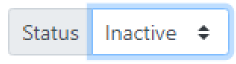
Status: The status of the credential (Active, Inactive, Revoked, Expired or All)
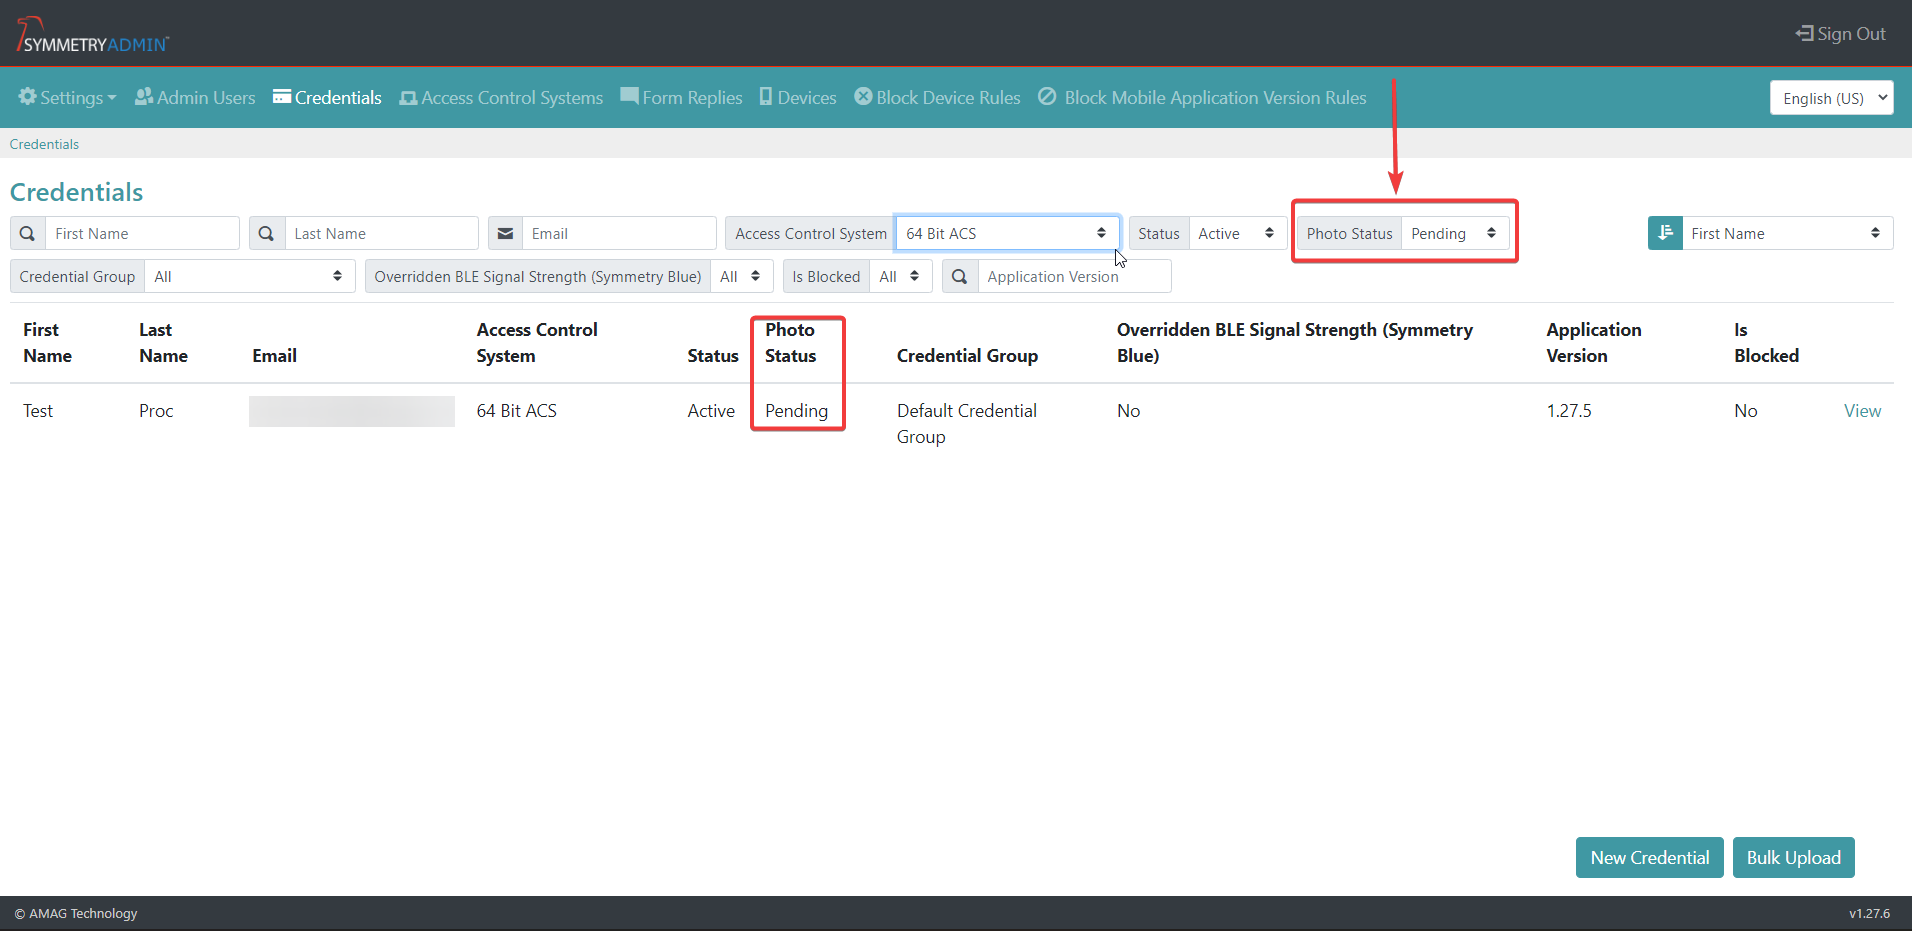
Photo Status: The status of the credential photo (All, Pending, Approved, Rejected or No Photo)
Credential Group: The credential group the credential is associated with
Credential Number: The credential/card number of the credential (To find a specific credential number quotation marks can be used as follows “2143”)
Overridden BLE Signal Strength (Symmetry Blue/Symmetry SENTRY): The status of the Overridden BLE Signal Strength (Symmetry Blue/Symmetry SENTRY) (Yes, No or All)
Is Blocked: If the credential is blocked (Yes, No or All)
Application Version: The version of the application being used when the credential was created.
The user can also sort the existing credentials in either a descending or ascending order using the following criteria:
First Name
Last Name
Email
Access Control System
Status
Photo Status
Credential Group
Card Number
Overridden BLE Signal Strength (Symmetry Blue/Symmetry SENTRY)
Blocked
Application Version
Note
The filter and sort settings will remain as the search criteria until the parameters are reset. Click the Reset button in the top left of the screen to reset the filter and sort values to the default settings.
Note
The number of credentials that match the search criteria will be displayed at the bottom of the page.
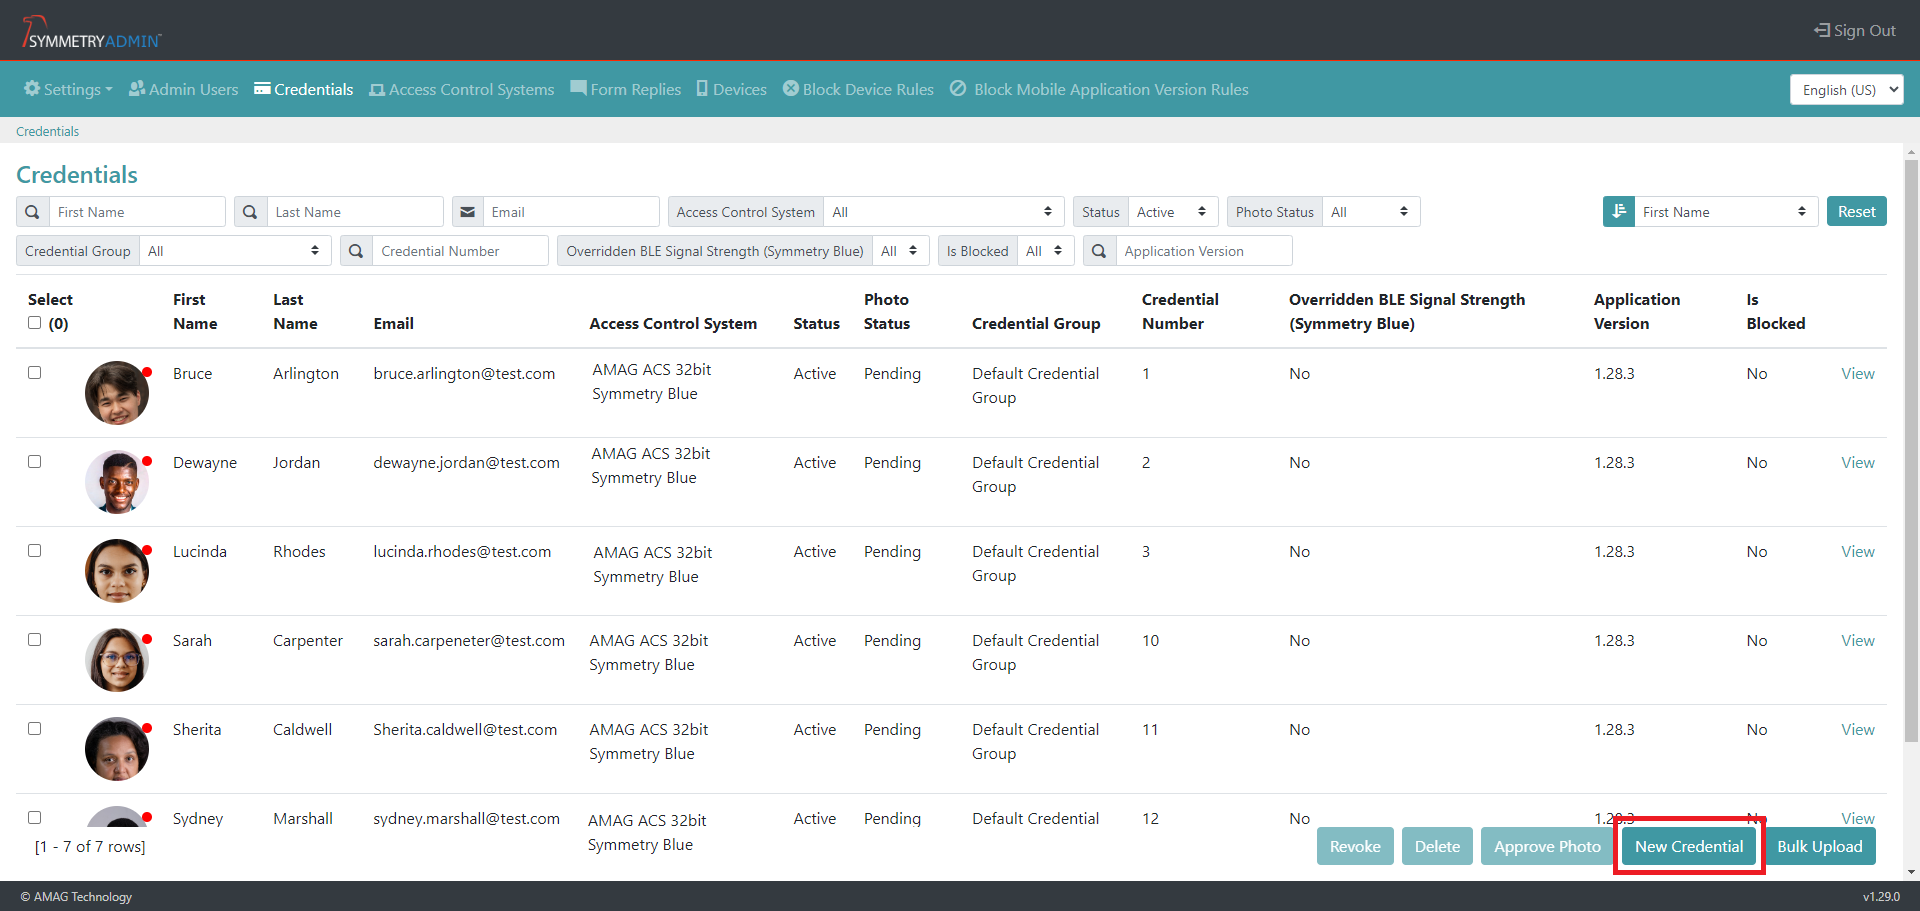
Adding a New Credential (Manually)
Click the New Credential button to create a a new credential.
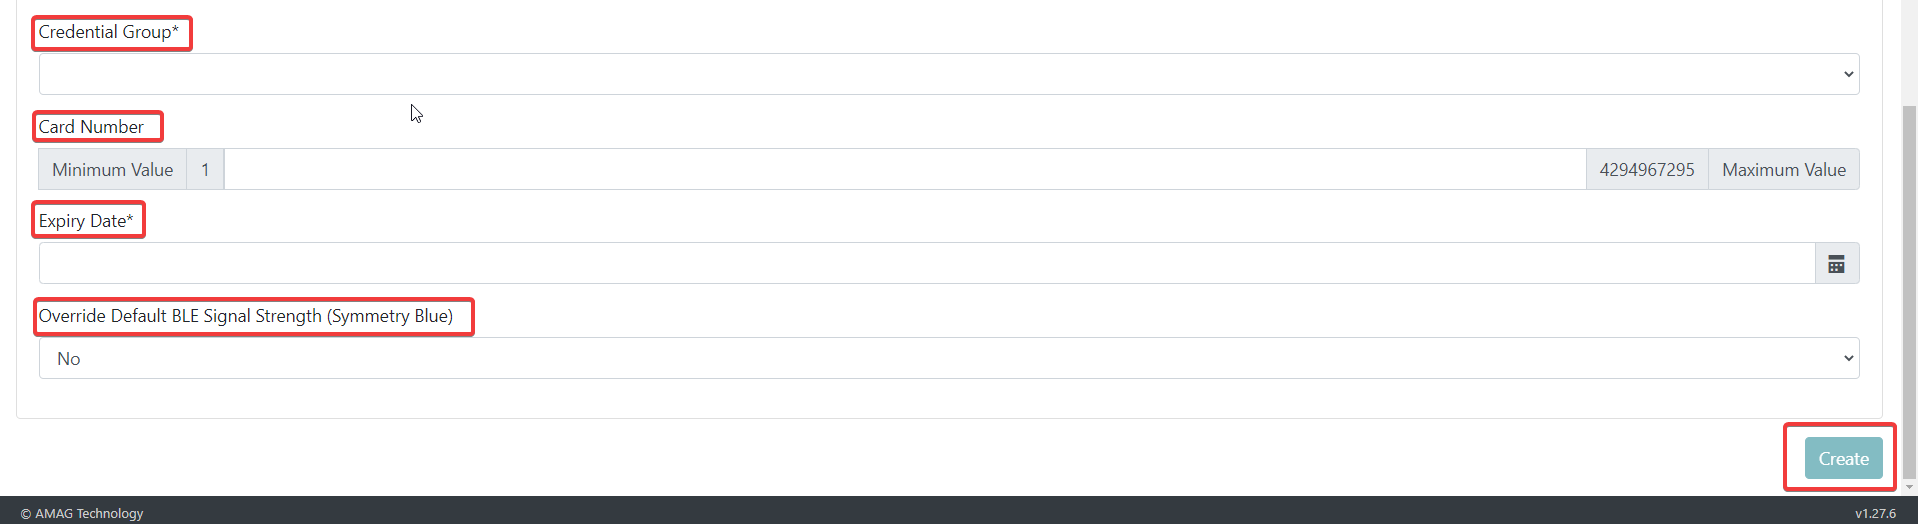
Specify:
First Name (Required)
Last Name (Required)
Email (Required)
Manager Email (Optional)
Employee Number (Optional)
Access Control System (Required)
Credential Group (Required)
Card Number (Optional)
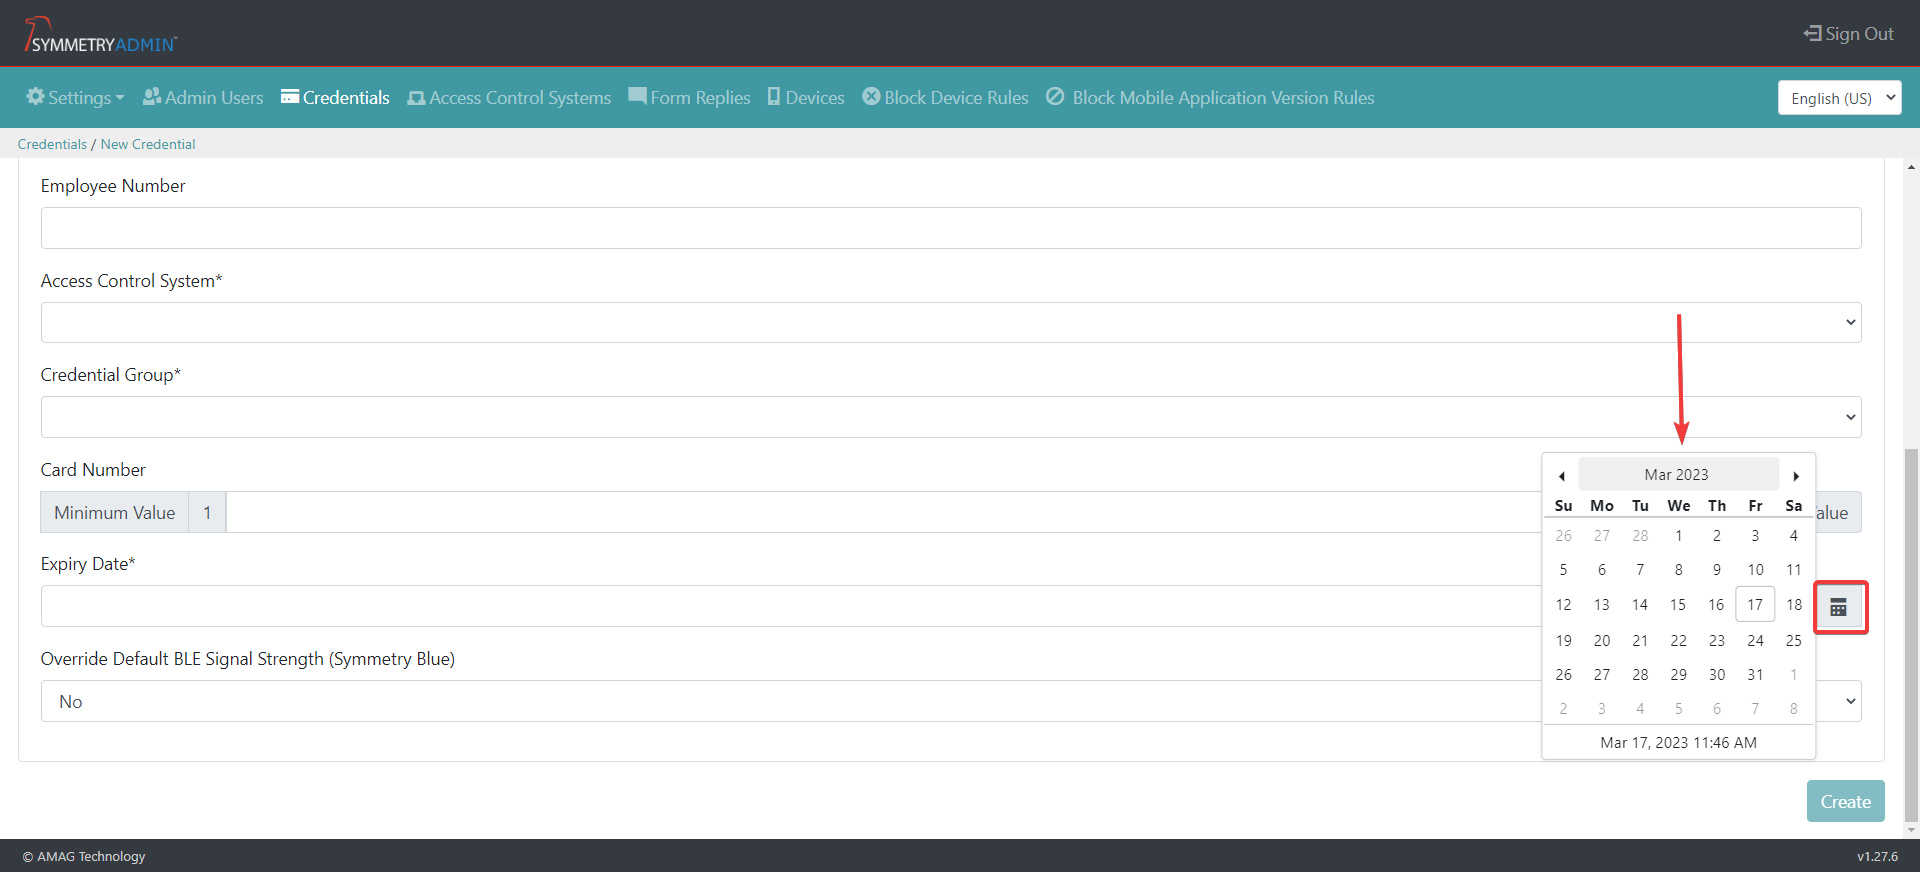
Expiry Date (Required if card number details have been provided)
Override Default BLE Signal Strength (Symmetry Blue/Symmetry SENTRY): Select either Yes or No
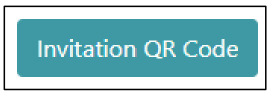
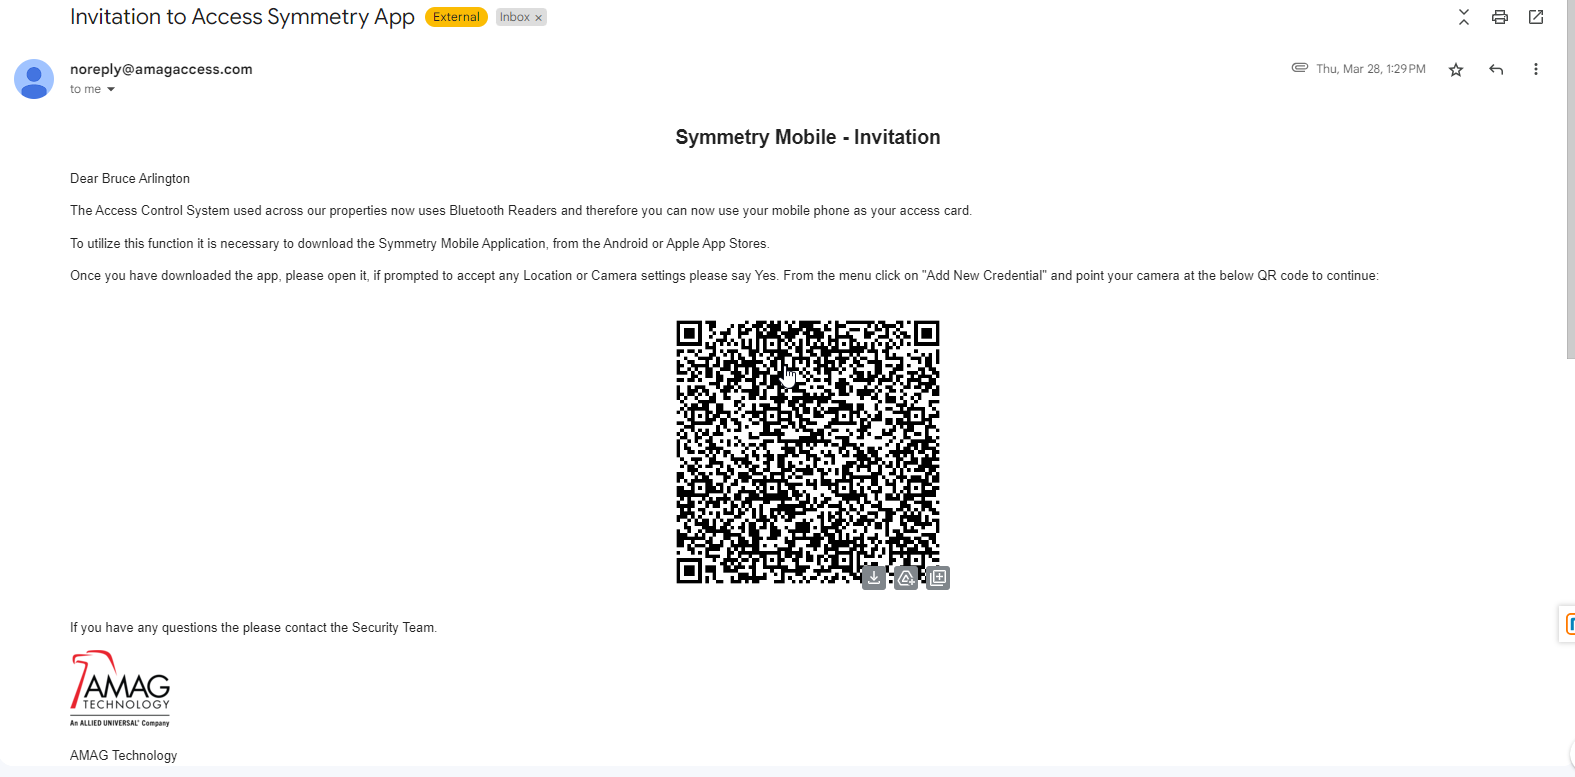
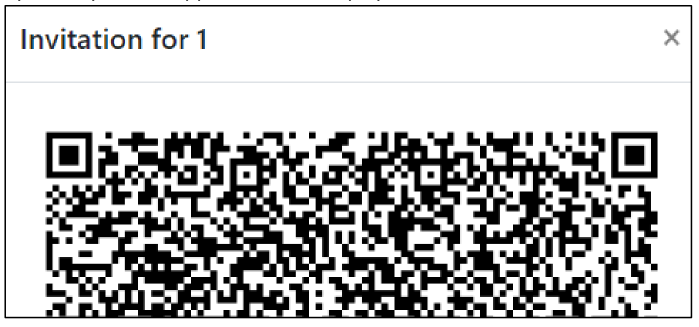
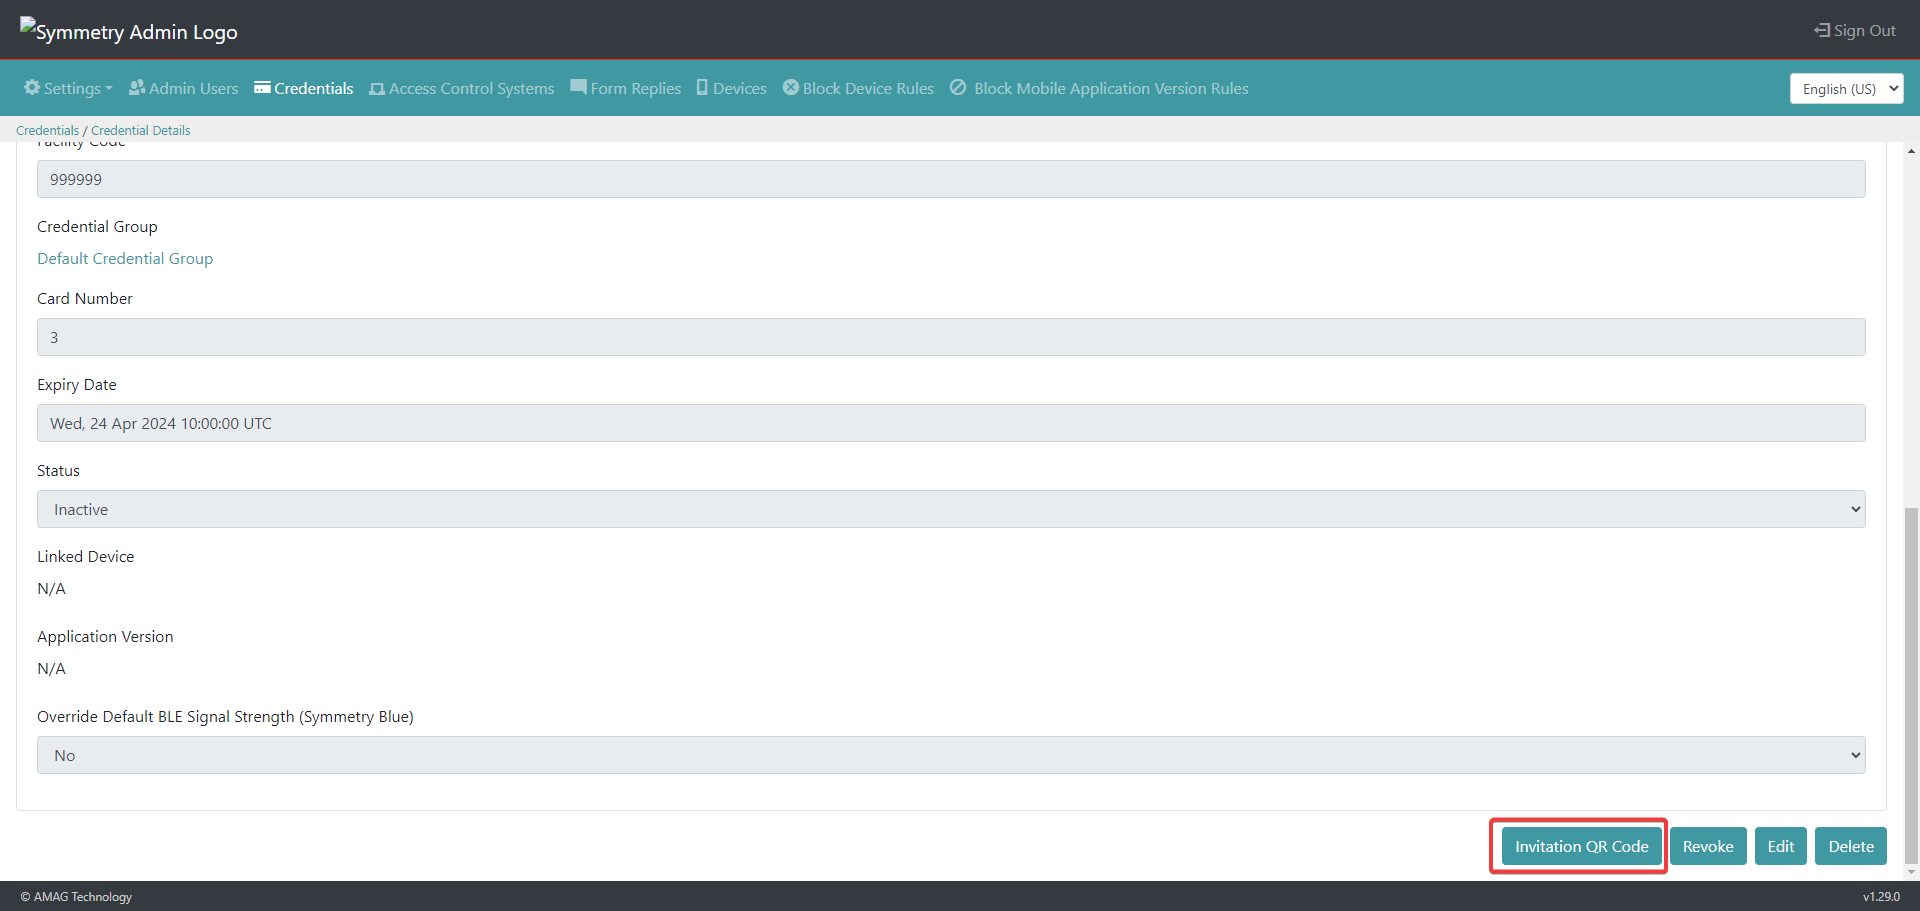
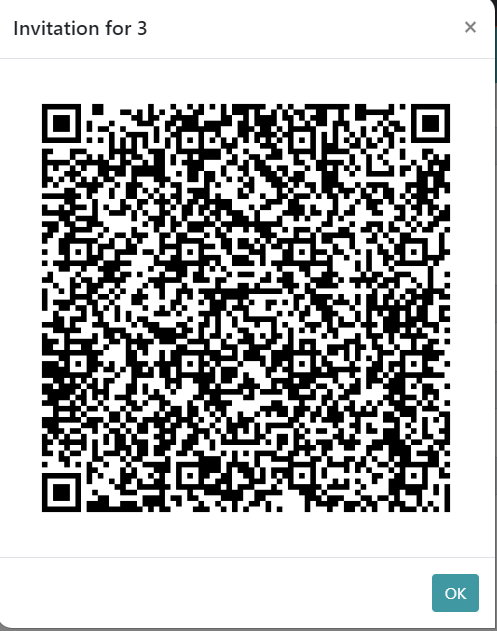
Once the relevant credential information has been added, click the Create button. Then click the Invitation QR Code button to allow the invitation QR code to be created, which can then be scanned by the Symmetry Mobile app. The user can also save the card/credential at this stage and an invitation email will be sent to the user to complete the process.
Other options available at this stage are: See section Credentials - Revoke, Delete and Approve Photo for further information.
Revoke: Will revoke the the credential
Edit: Allows the credential information to be edited
Delete: Will delete the credential
The credential/card will be Inactive until associated with a Mobile device, and will become Active when the QR Code is scanned.
If the new credential was saved without scanning the QR Code. On the credentials main page, change the Status Filter to Inactive. This will filter all credentials that have been created but have not been activated.
Select the credential that you require to activate and click the View button adjacent to the credential.
Scroll to the bottom of the page and click the Invitation QR Code button to allow the invitation QR code to be created.

Use the Symmetry Mobile app to Scan the displayed QR Code.
In the Symmetry Mobile app, select Menu > Add New Credential.
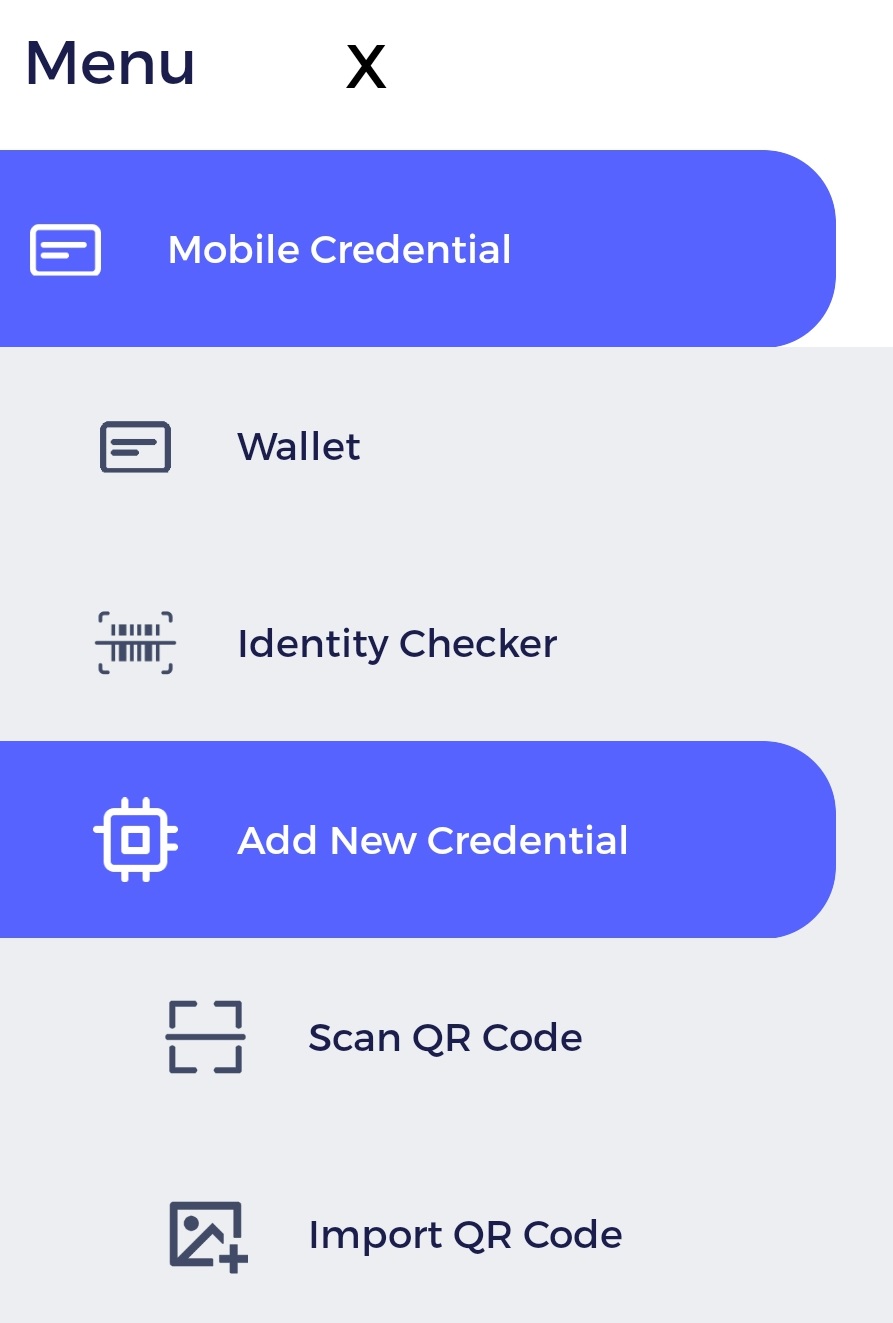
The user can now Scan QR Code or Import QR Code:
Scan QR Code: Uses the camera on the users device to scan the QR code
Import QR Code: Allows the user to verify the credential using the QR code imported to the users device
Once the QR code has been accepted, the user will then be notified to complete the credential setup.
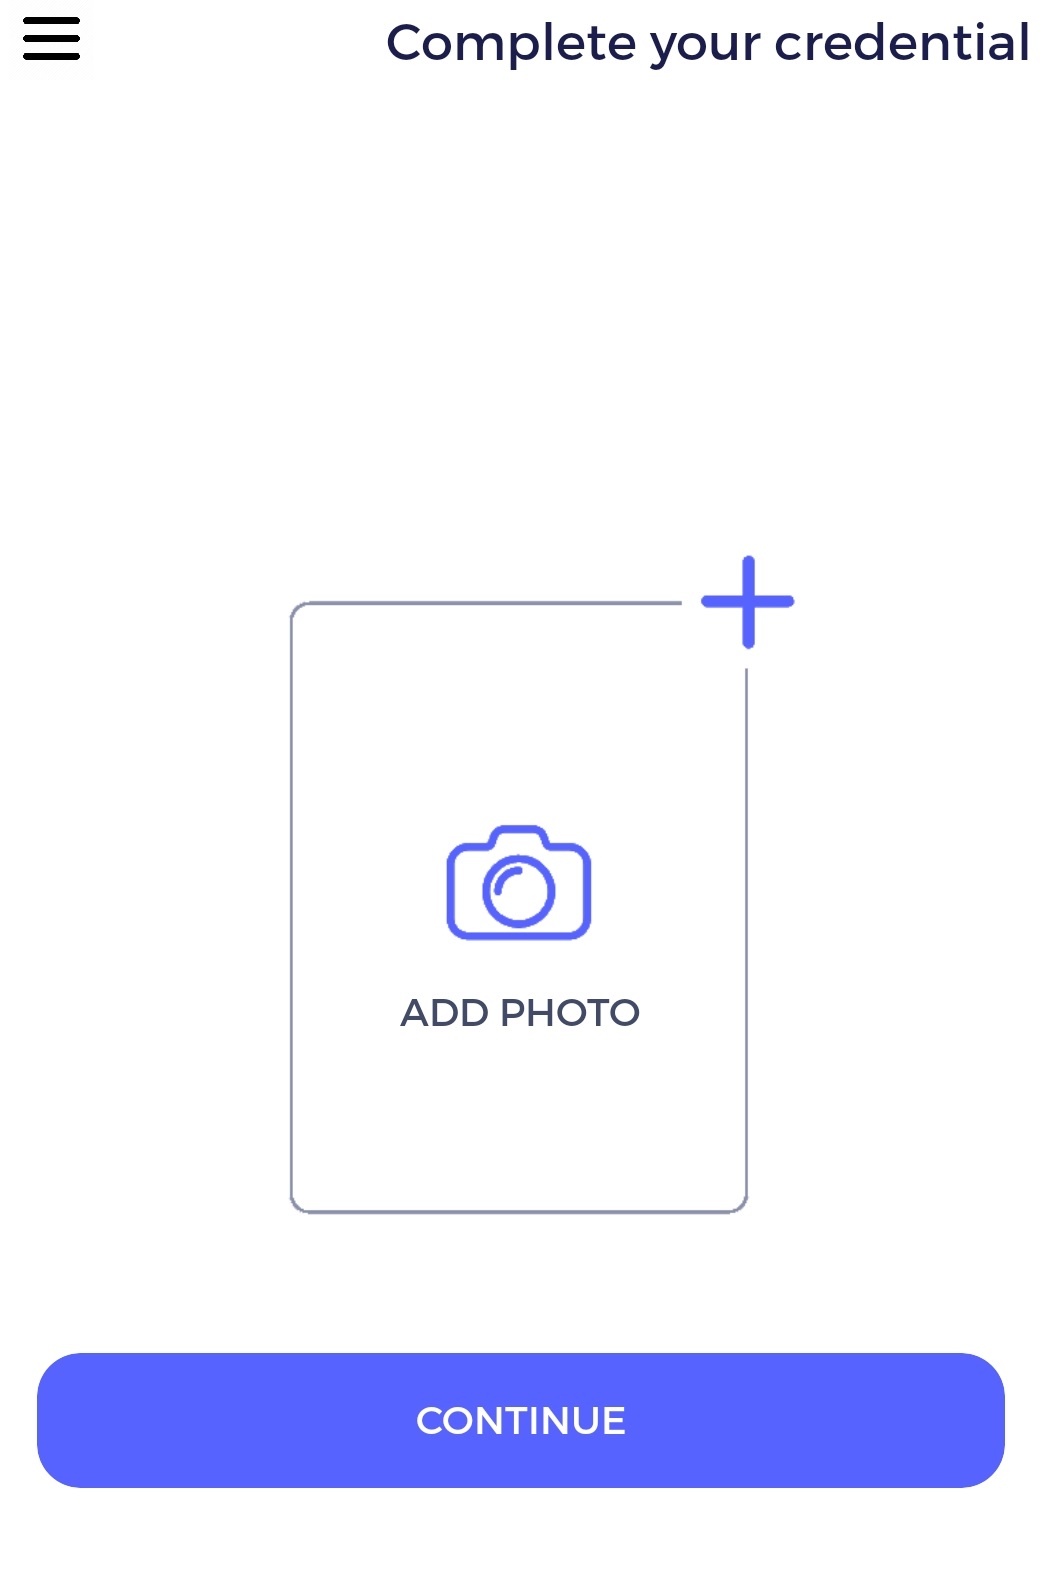
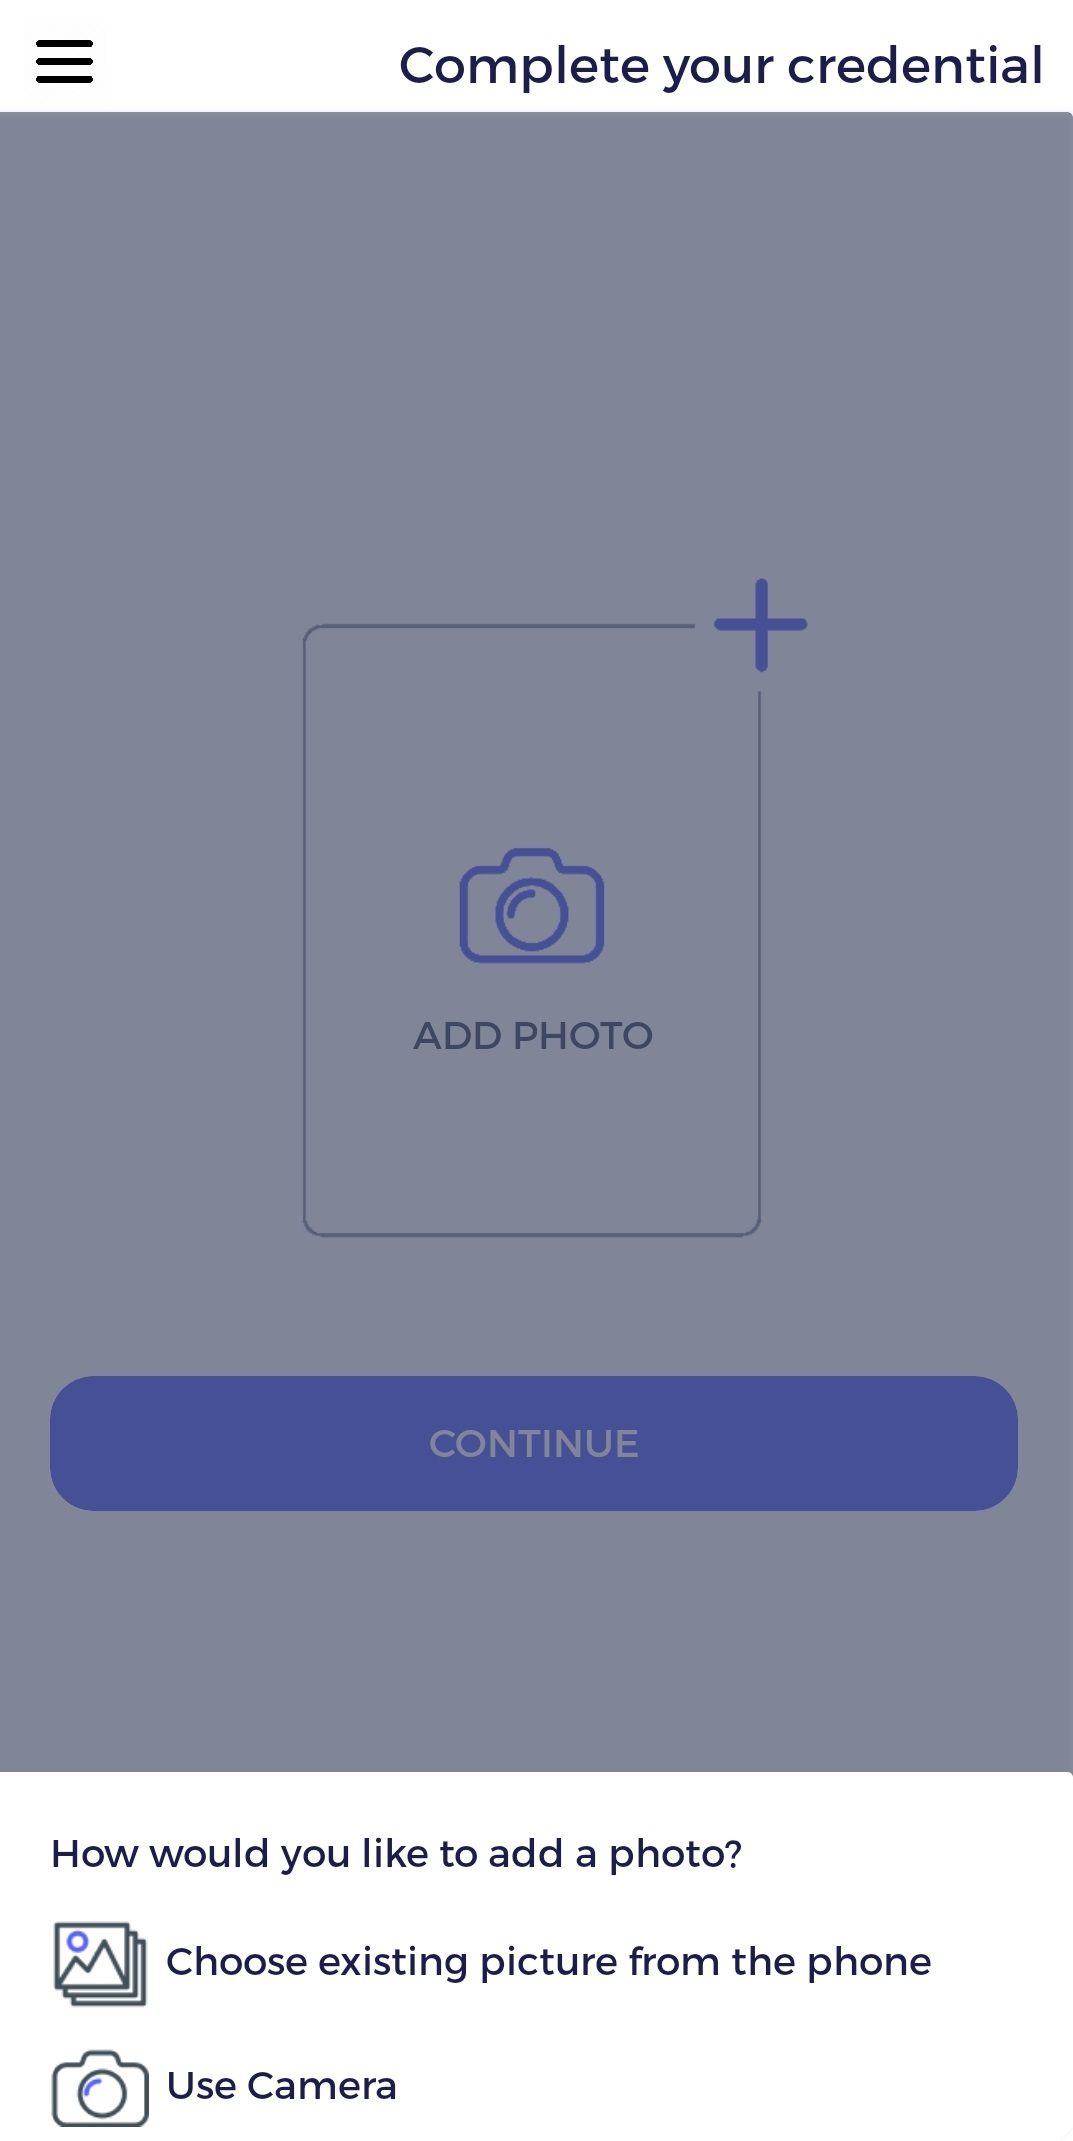
The user now has the option to update their photo.
Note
If the user does not update the photo within the Symmetry Mobile app then a notifications for each credential without a photo will appear each time the app is opened.
Use Camera: Allows the user to take a live picture using the devices camera
Choose existing picture from the phone: Allows the user to upload an existing picture from the device
Note
Mobile Credential Images that exceed 1920x1080 will be automatically rescaled.
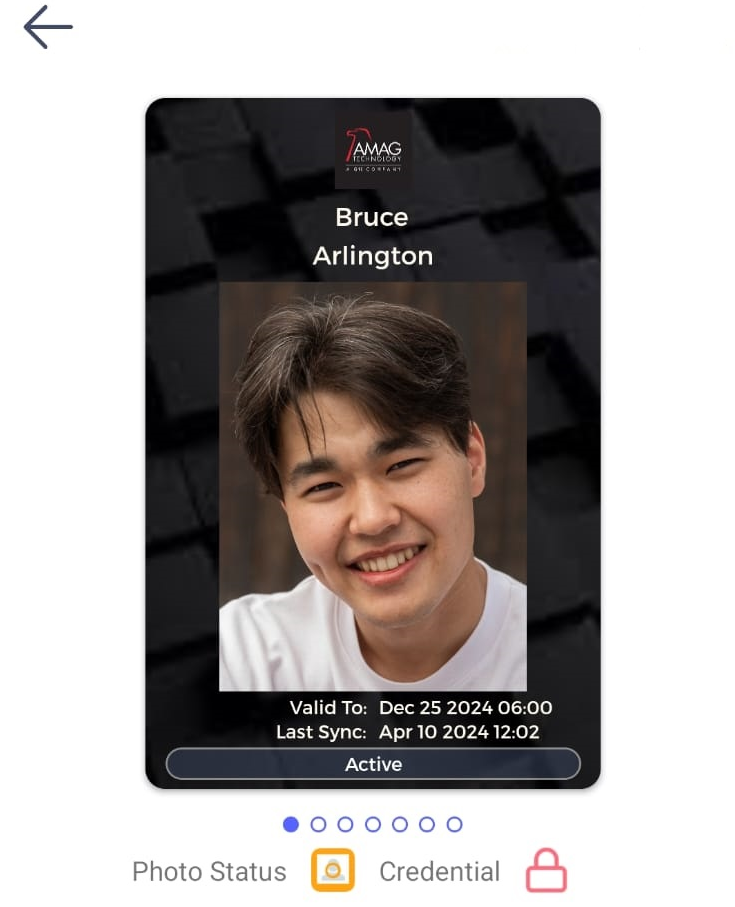
The Credential will now be available within the Symmetry Mobile app.
Note
The photo status will be shown with an amber box around the symbol until it has been approved, once the picture has been approved the amber box will convert to a green box.
The Photo will now require Approval in the Admin Portal, In the Credentials section, change the Photo Status filter to Pending.
On the photo, select Pending Approval.
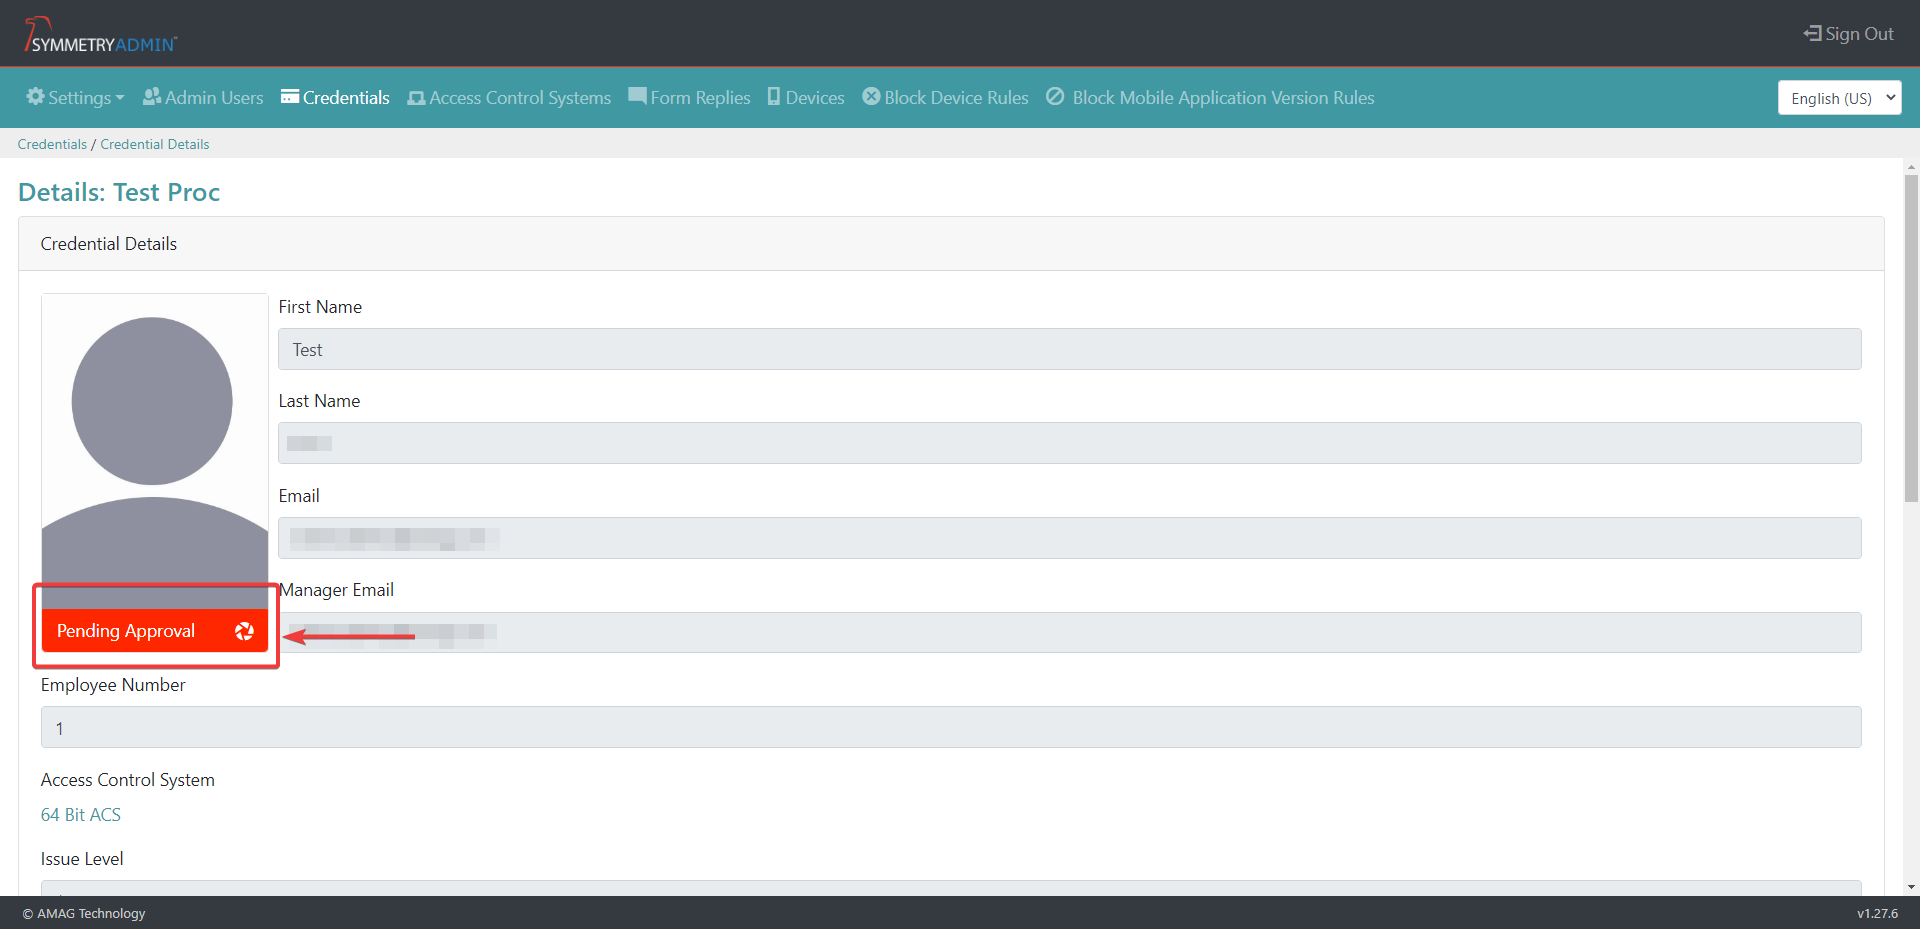
The user can now select Approve or Reject the submitted profile picture. If the picture is approved the process is now complete. If the photo is rejected continue with this user guide.

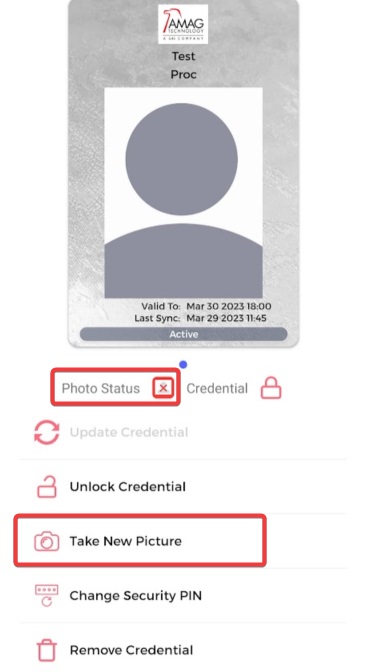
If the photo is Rejected by admin. Within the Symmetry Mobile app the Photo Status will update and the option to Retake the Photo, or upload a different photo will be enabled. The credential owner will also get a notification that the photo has been rejected each time the app is opened.
Select Take New Picture on the mobile app.
Note
The photo status will show as rejected within the mobile app, highlighted by a red border around the photo status symbol. Until the photo has been approved and completed the photo approve process.
In the Admin Portal-Credential setting area select Pending Approval again and Approve.
Adding a New Credential (Bulk Upload)
The user can bulk upload credentials by downloading a CSV file, supplying the relevant information for the bulk upload into the CSV/spreadsheet. Then upload the CSV file with the bulk upload data back into the Admin Portal > Credentials section following the guide below. This allows an efficient credential creation process to be utilized.
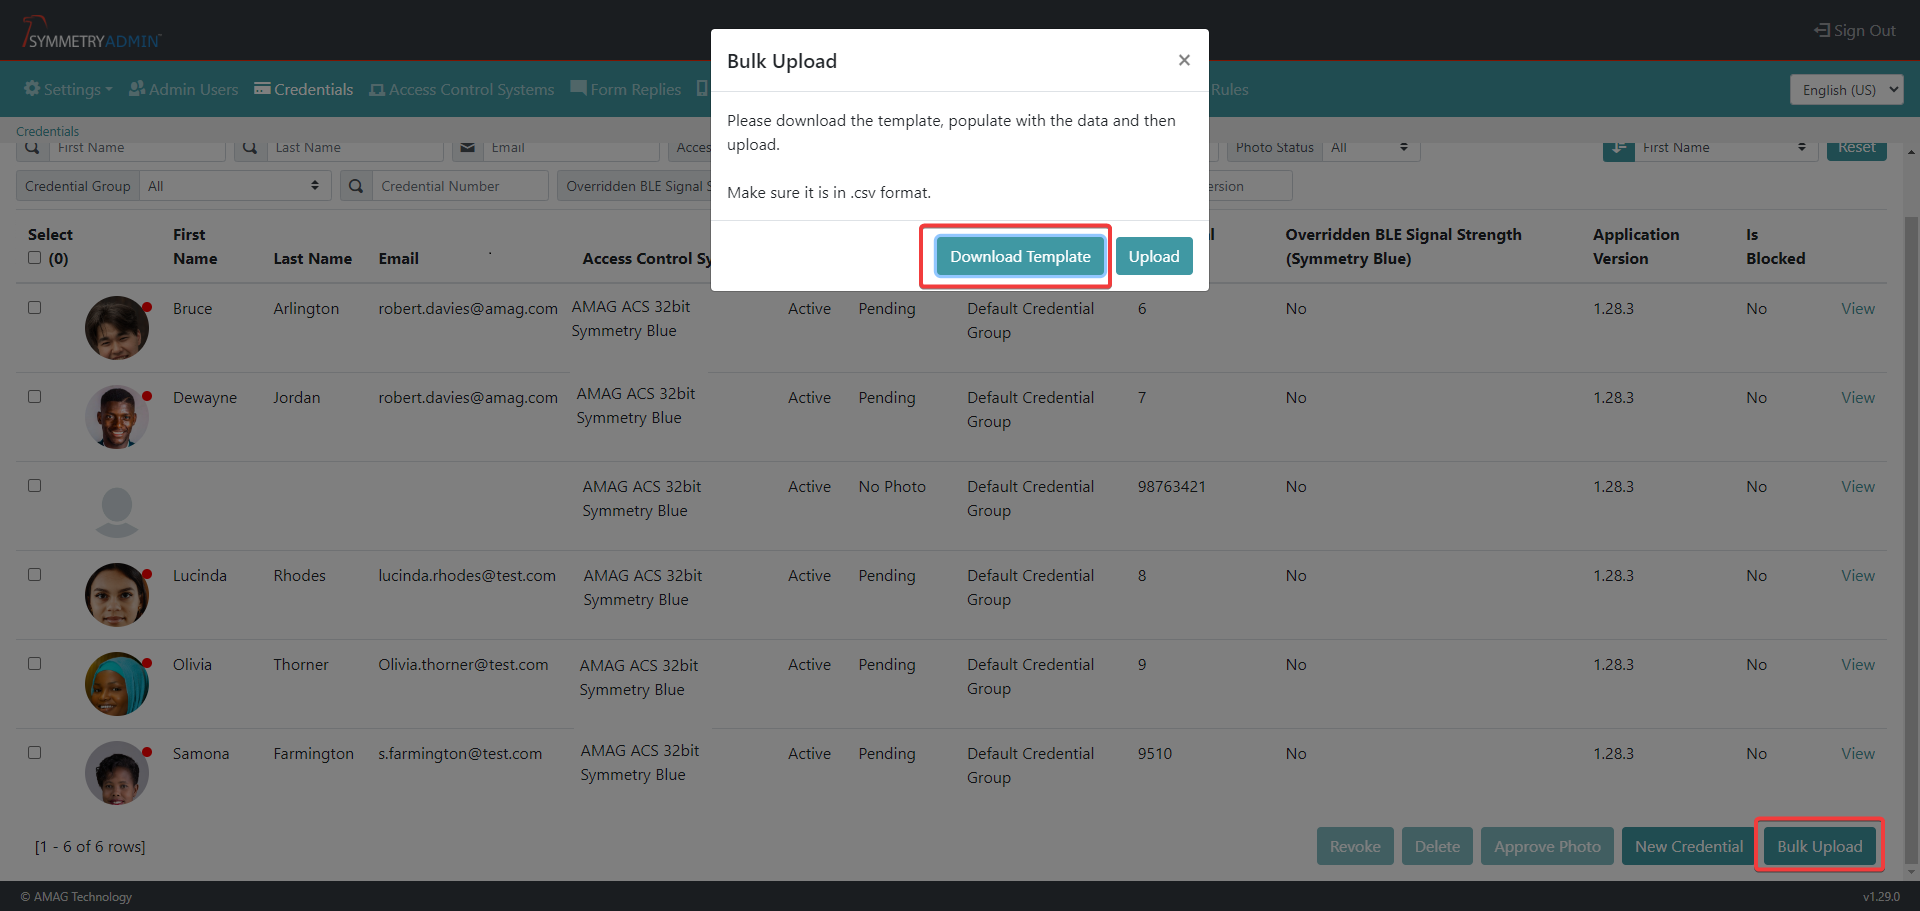
Click the Bulk Upload button to create a bulk upload CSV file.
Click the Download Template button. This will then create a CSV template, save this template to a suitable destination and open using excel or similar.
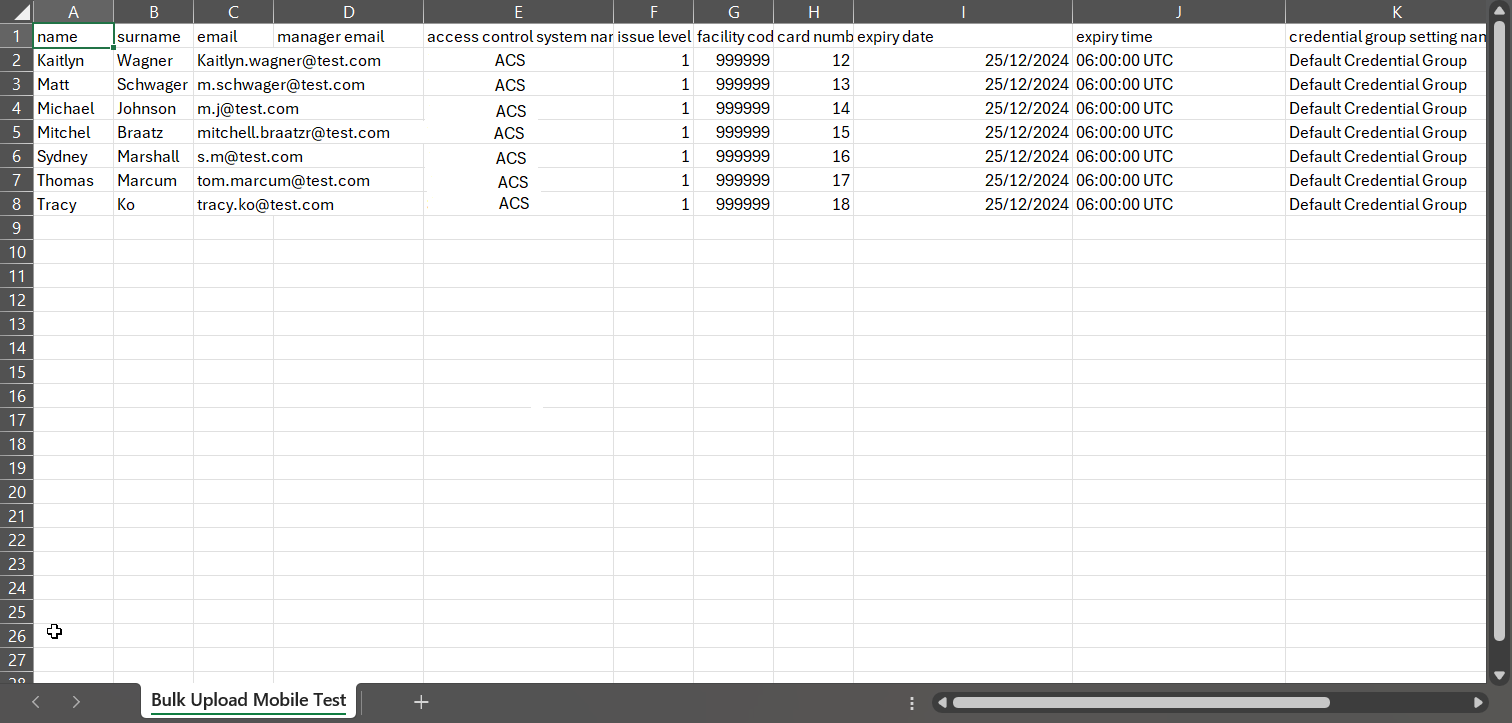
Input the appropriate information into the CSV file for the bulk upload. Save the template in a suitable location.
Note
Time and date cells are required to use the correct format.
Note
Make sure the file is saved as CSV file.
Click the Bulk Upload button, then click the Upload button. Search for the updated CSV template (in the suitable location it was saved in the last step) and begin upload.
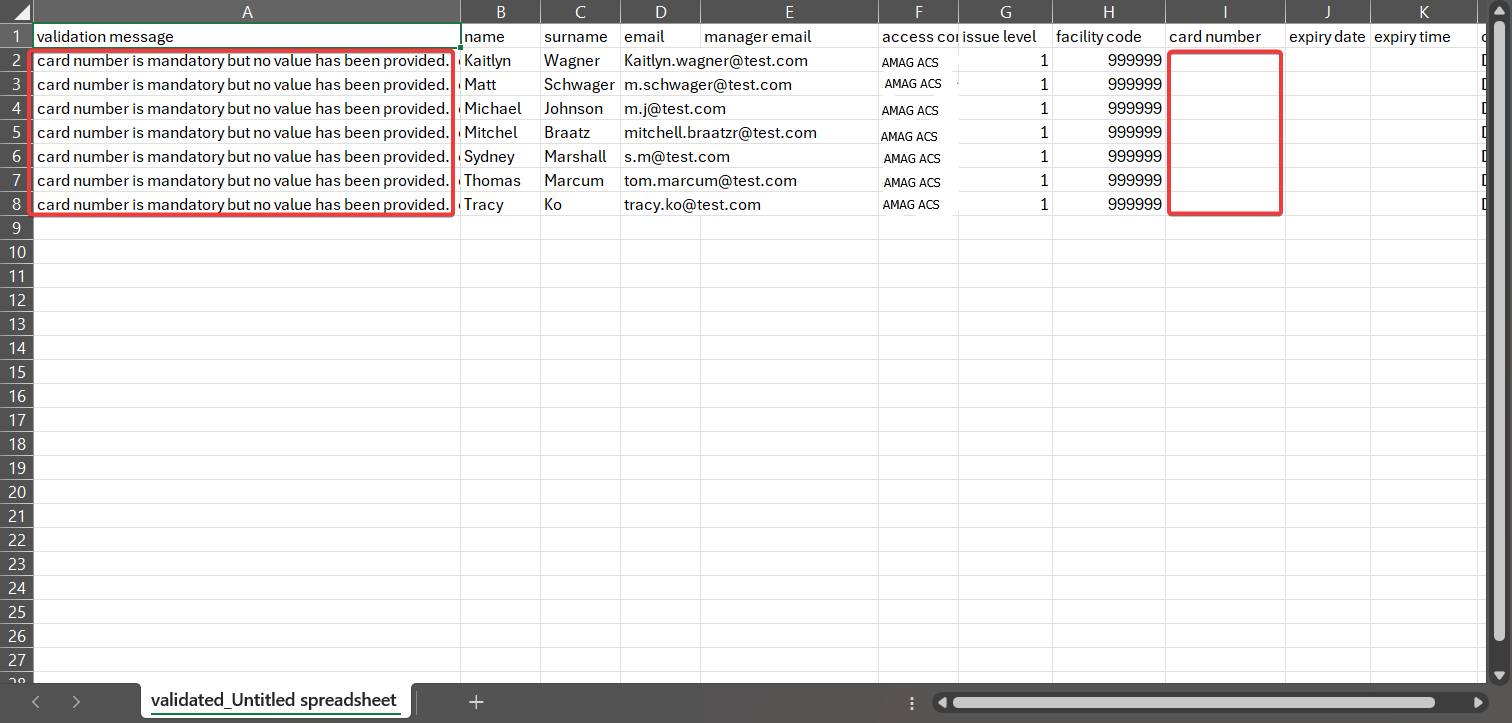
If the upload is unsuccessful, a banner will be displayed at the top of the page stating the upload has failed. The user can also be provided with a validation fail note provided by the failed CSV file template upload. This will supply a meaningful explanation for the failure of the upload.
If the credential bulk upload via CSV file is successful a banner will be displayed at the top of the page with a note that the upload was successful.
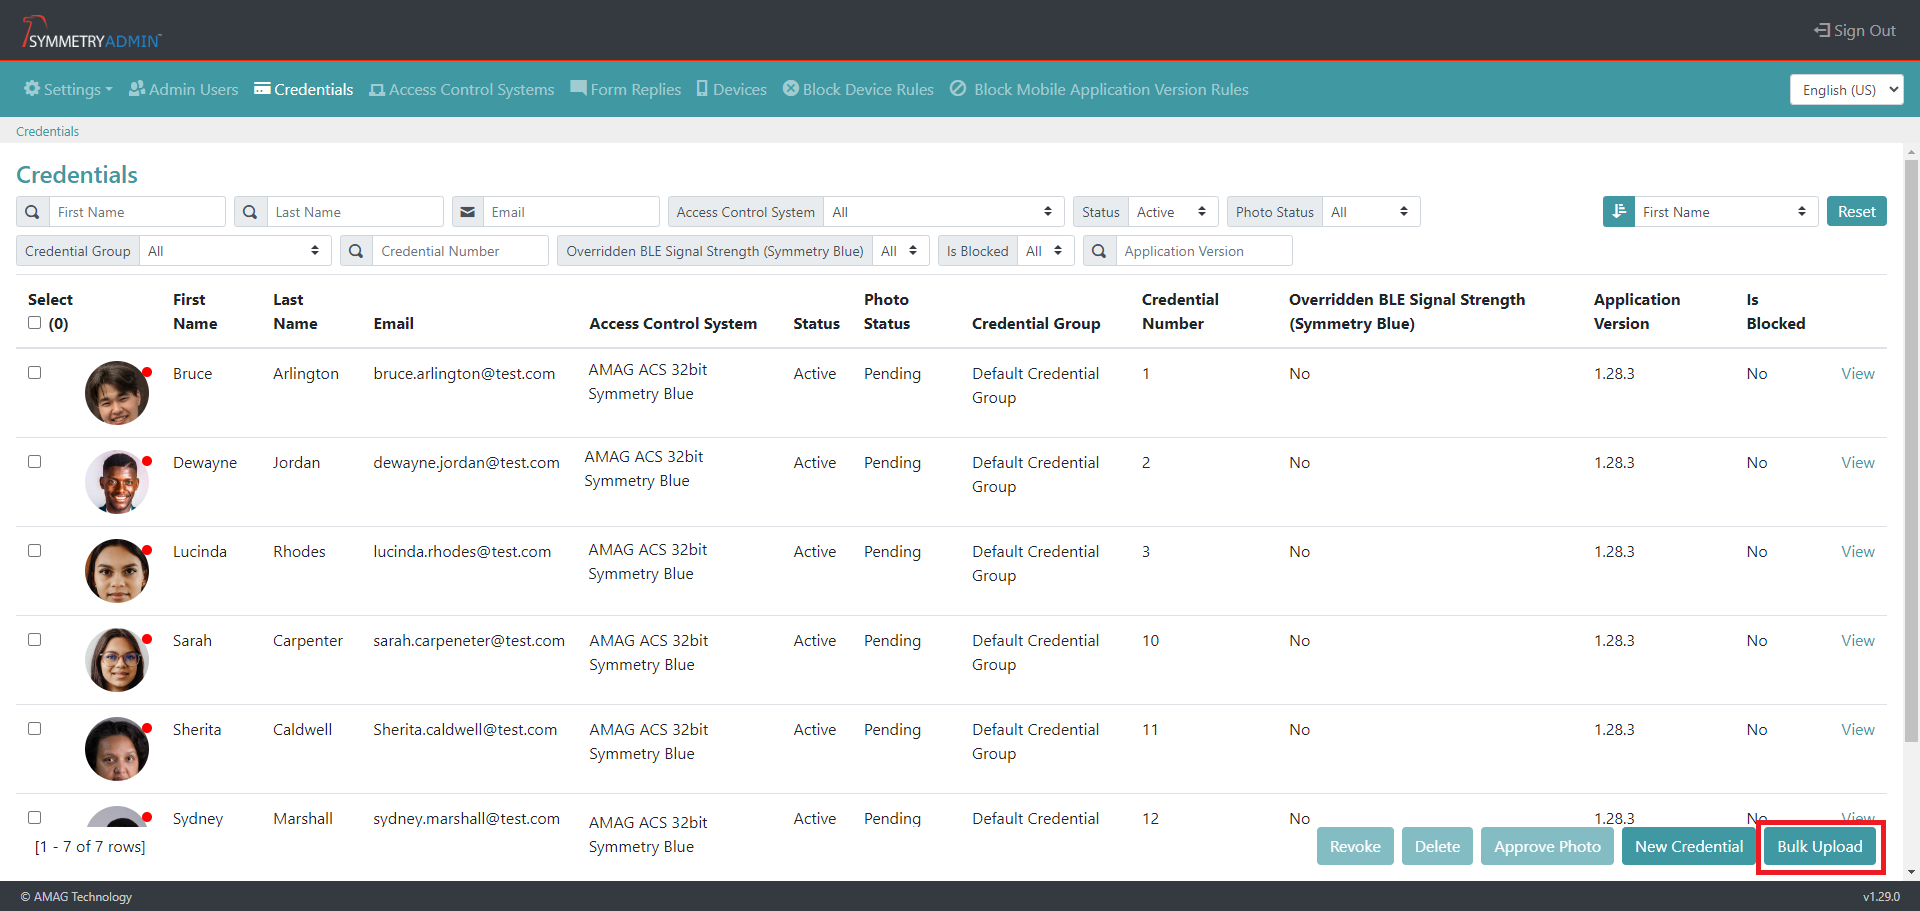
Credentials - Revoke, Delete and Approve Photo
In the Admin Portal > Credentials section, the user can also complete the Revoke or Delete credential task. The user can also approve or reject photo requests.
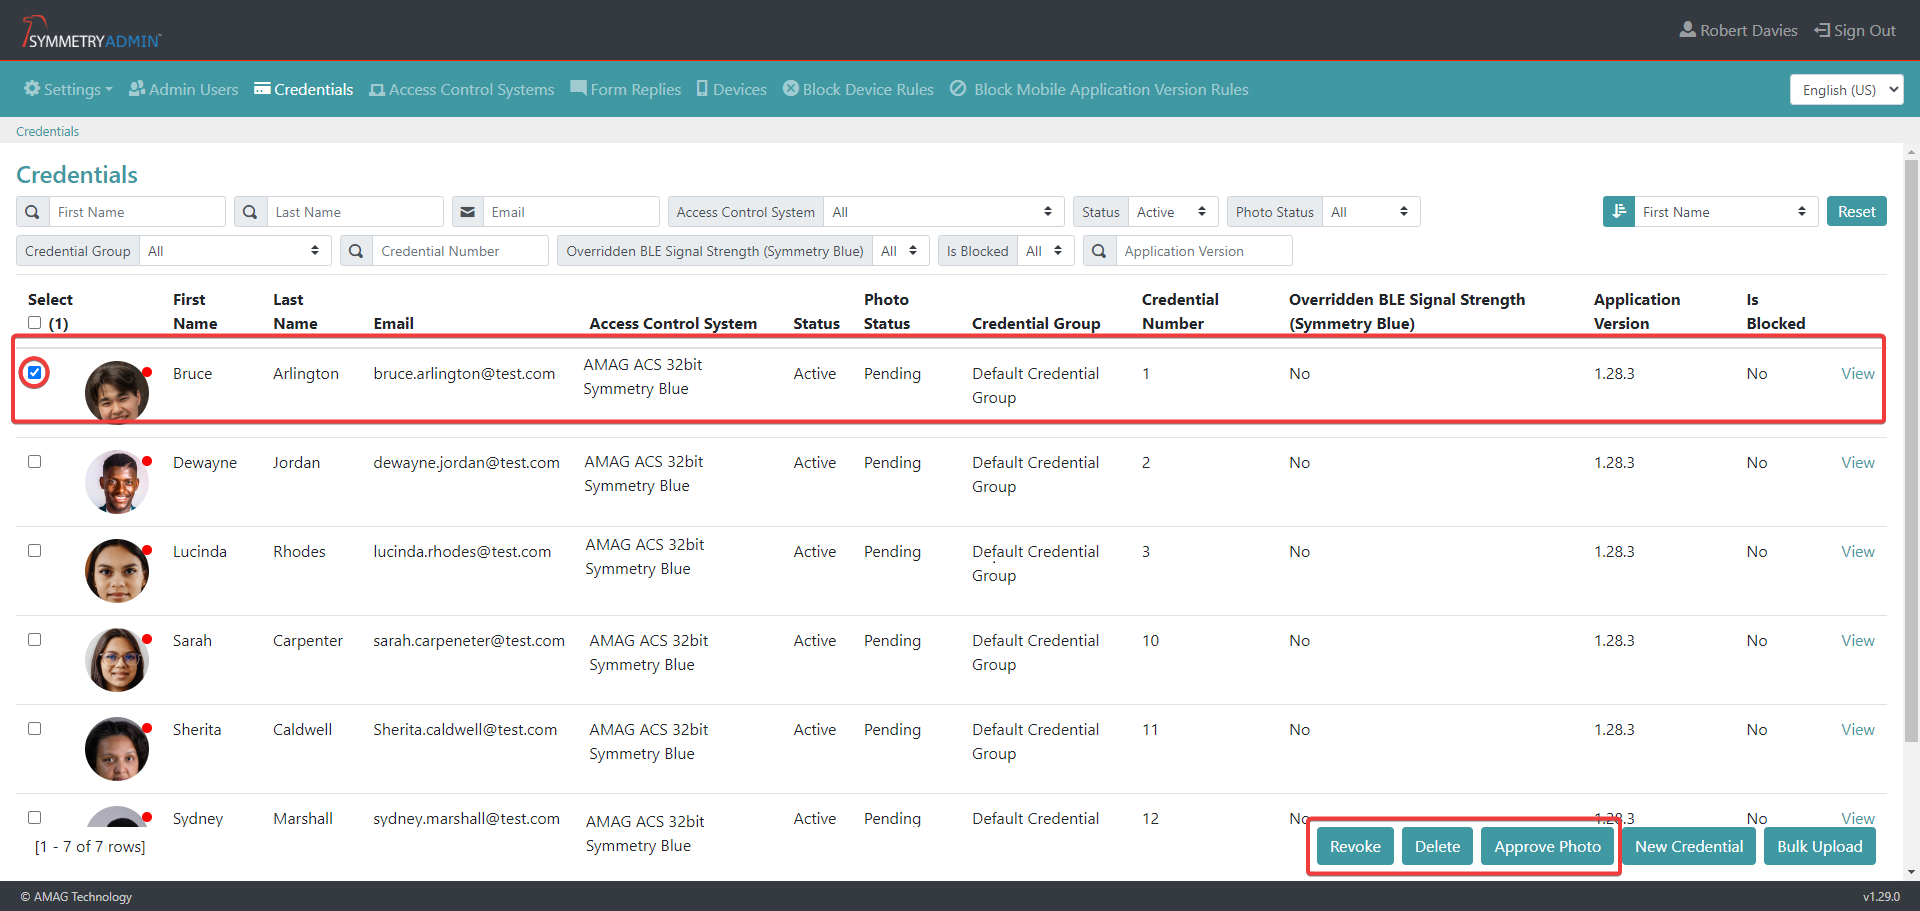
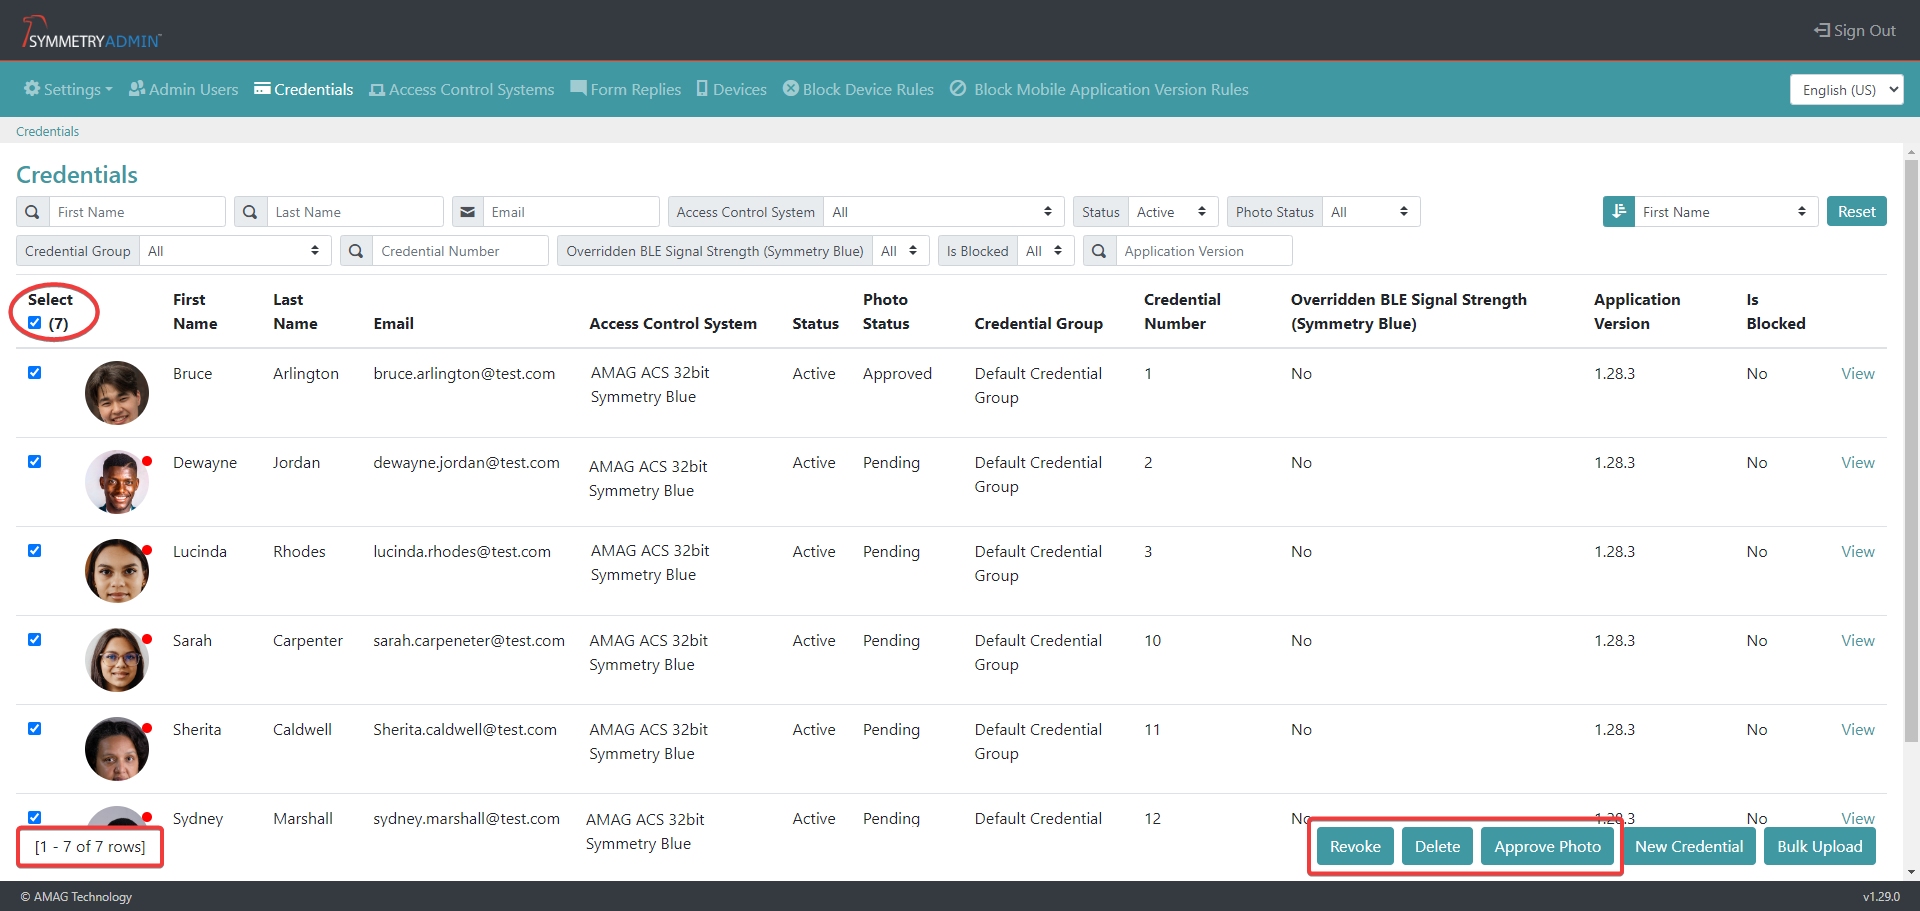
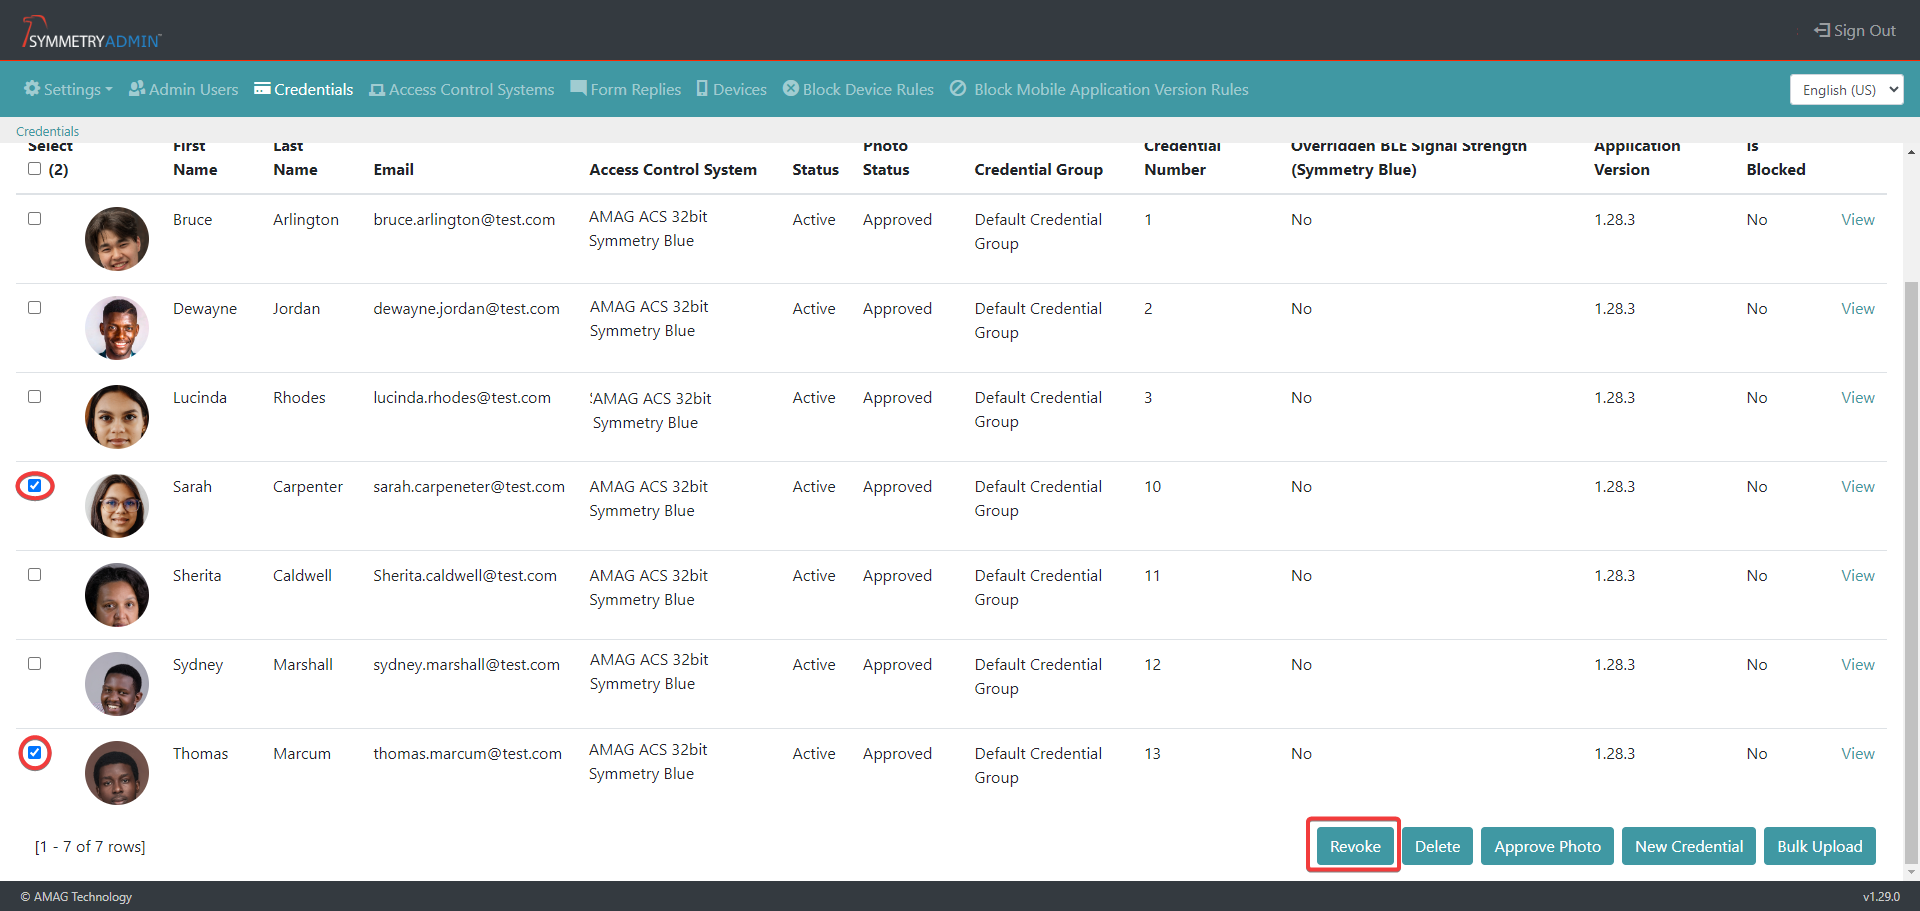
This page will allow the user to select individual, multiple or all credentials to apply revoke, delete or photo approval updates.
Note
The number of selected credentials is displayed in the top left corner of the page.
Revoke:
The user can revoke credentials, edit credentials once revoked and can also delete revoked credentials.
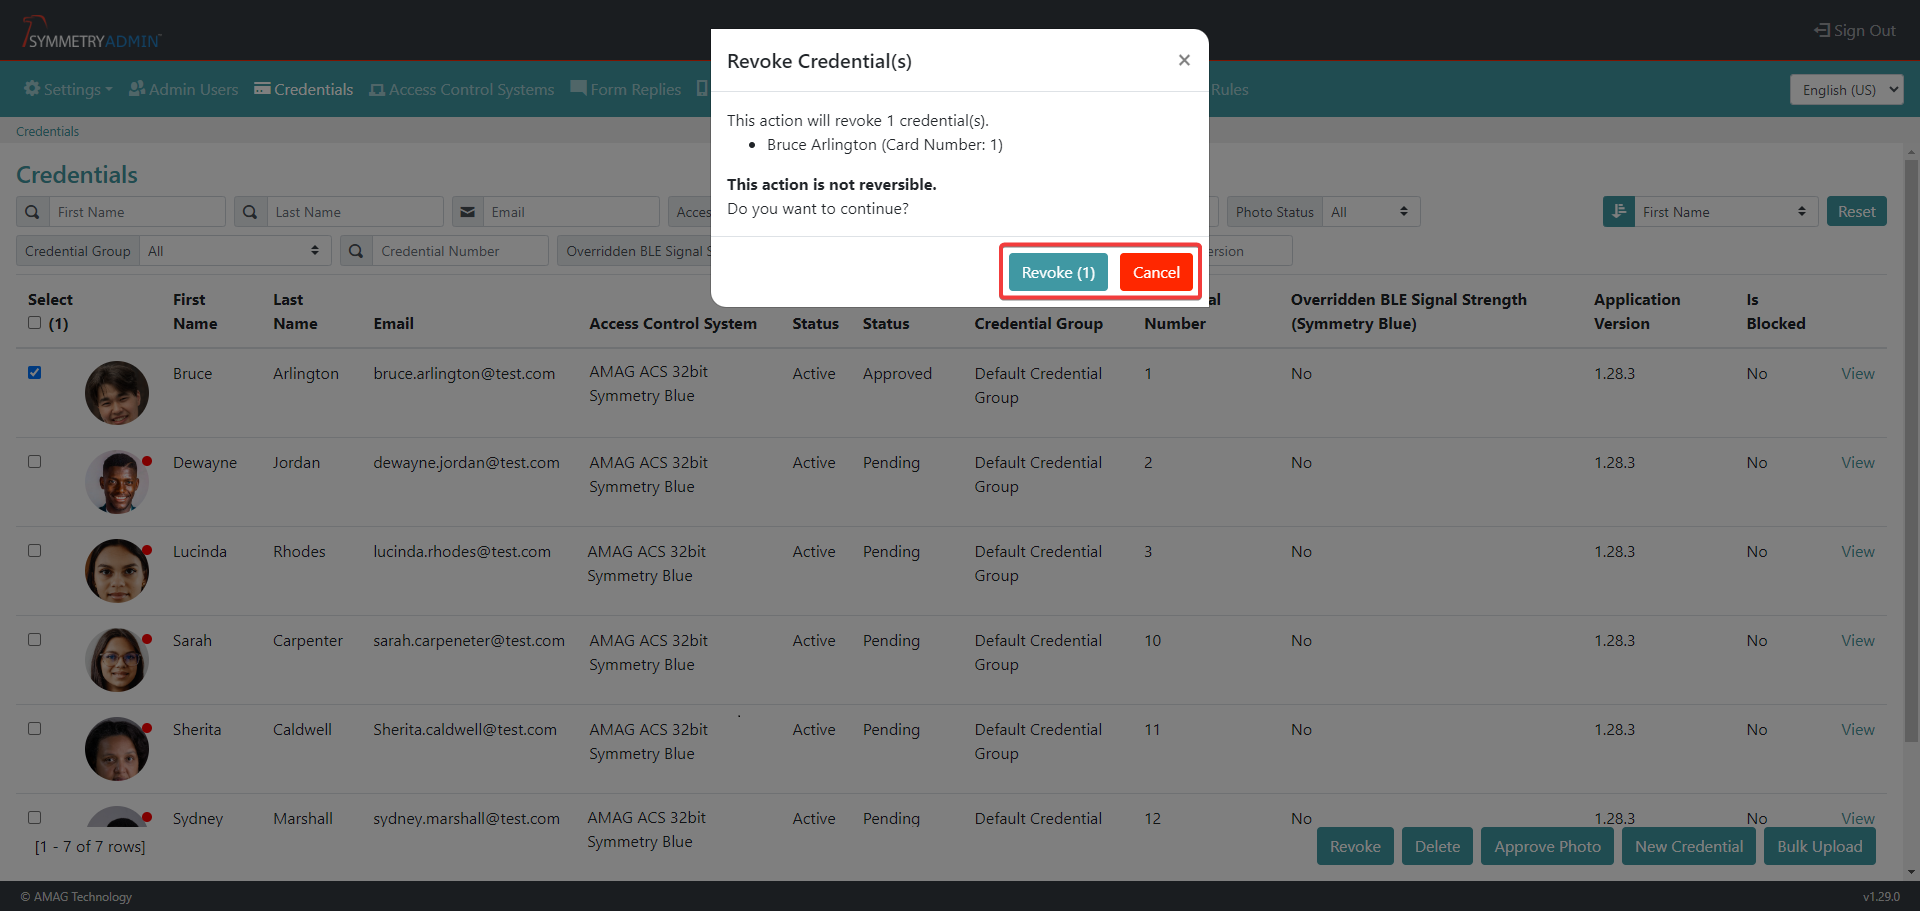
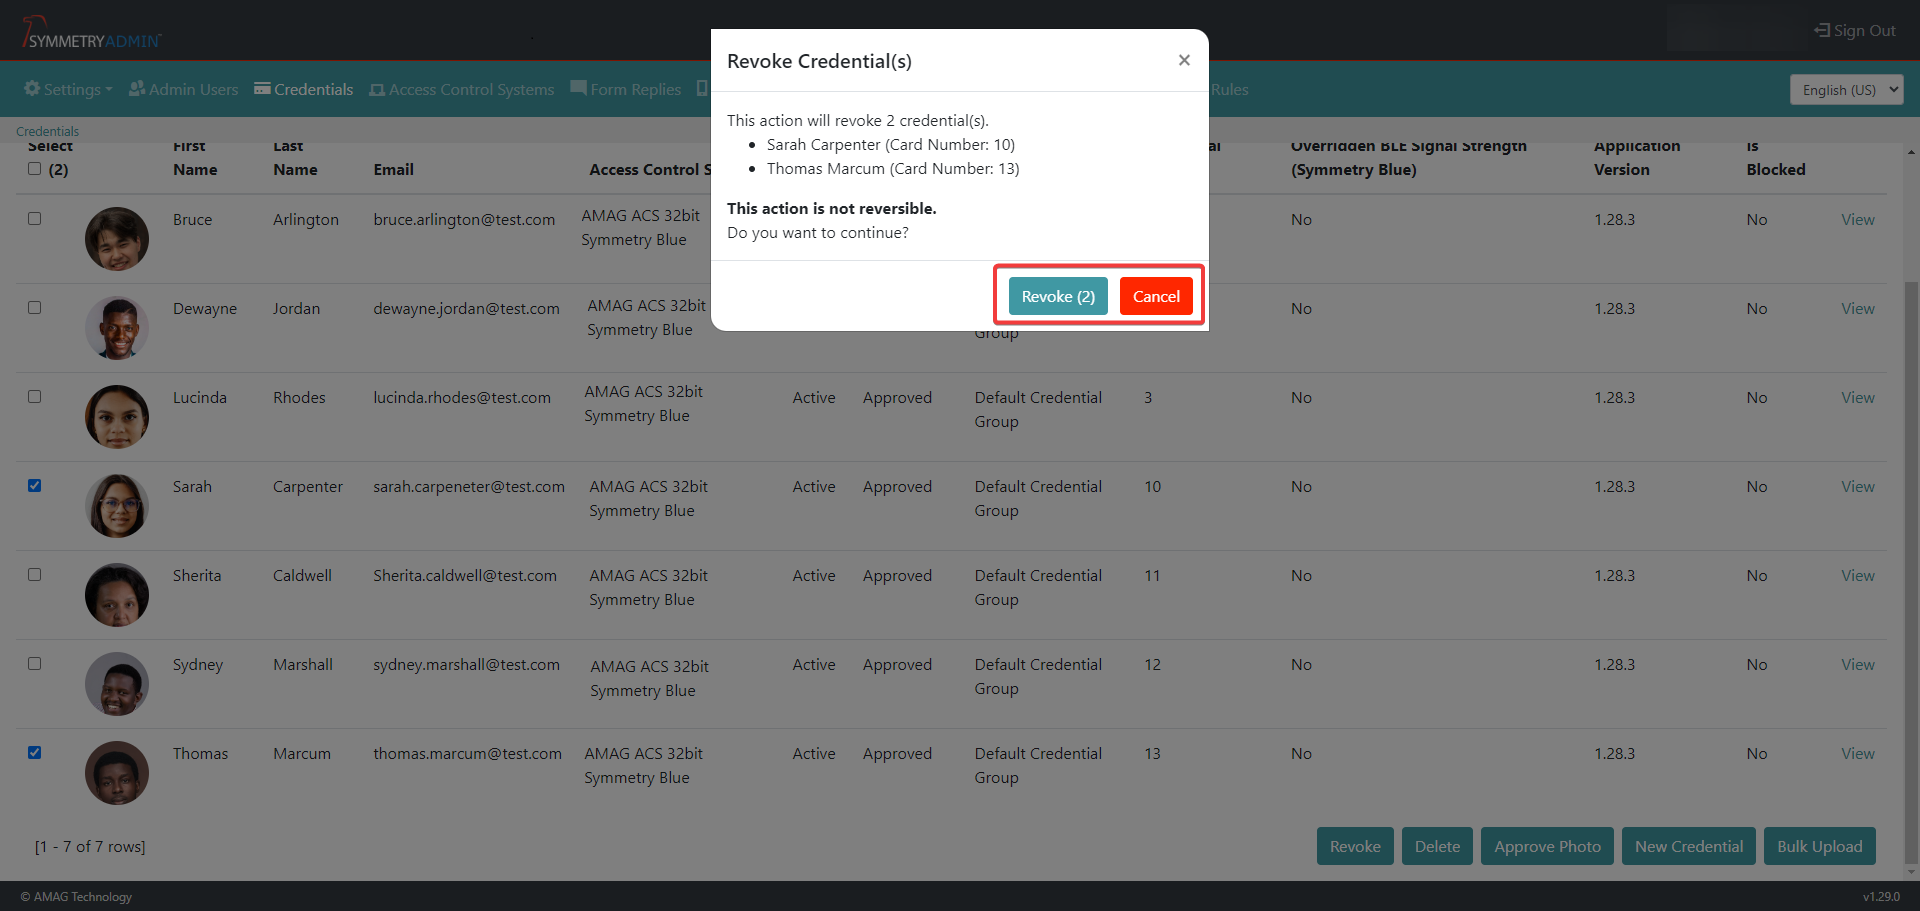
The user can select individual, multiple or all credentials to apply the revoke action. Once the credentials have been selected click on the Revoke button.
A pop up message will appear. This message will provide the user with the details of the credentials that have been selected to be revoked. The user can either click the Revoke button to approve the revoked credentials or click the Cancel button to cancel the revoke of the selected credentials.
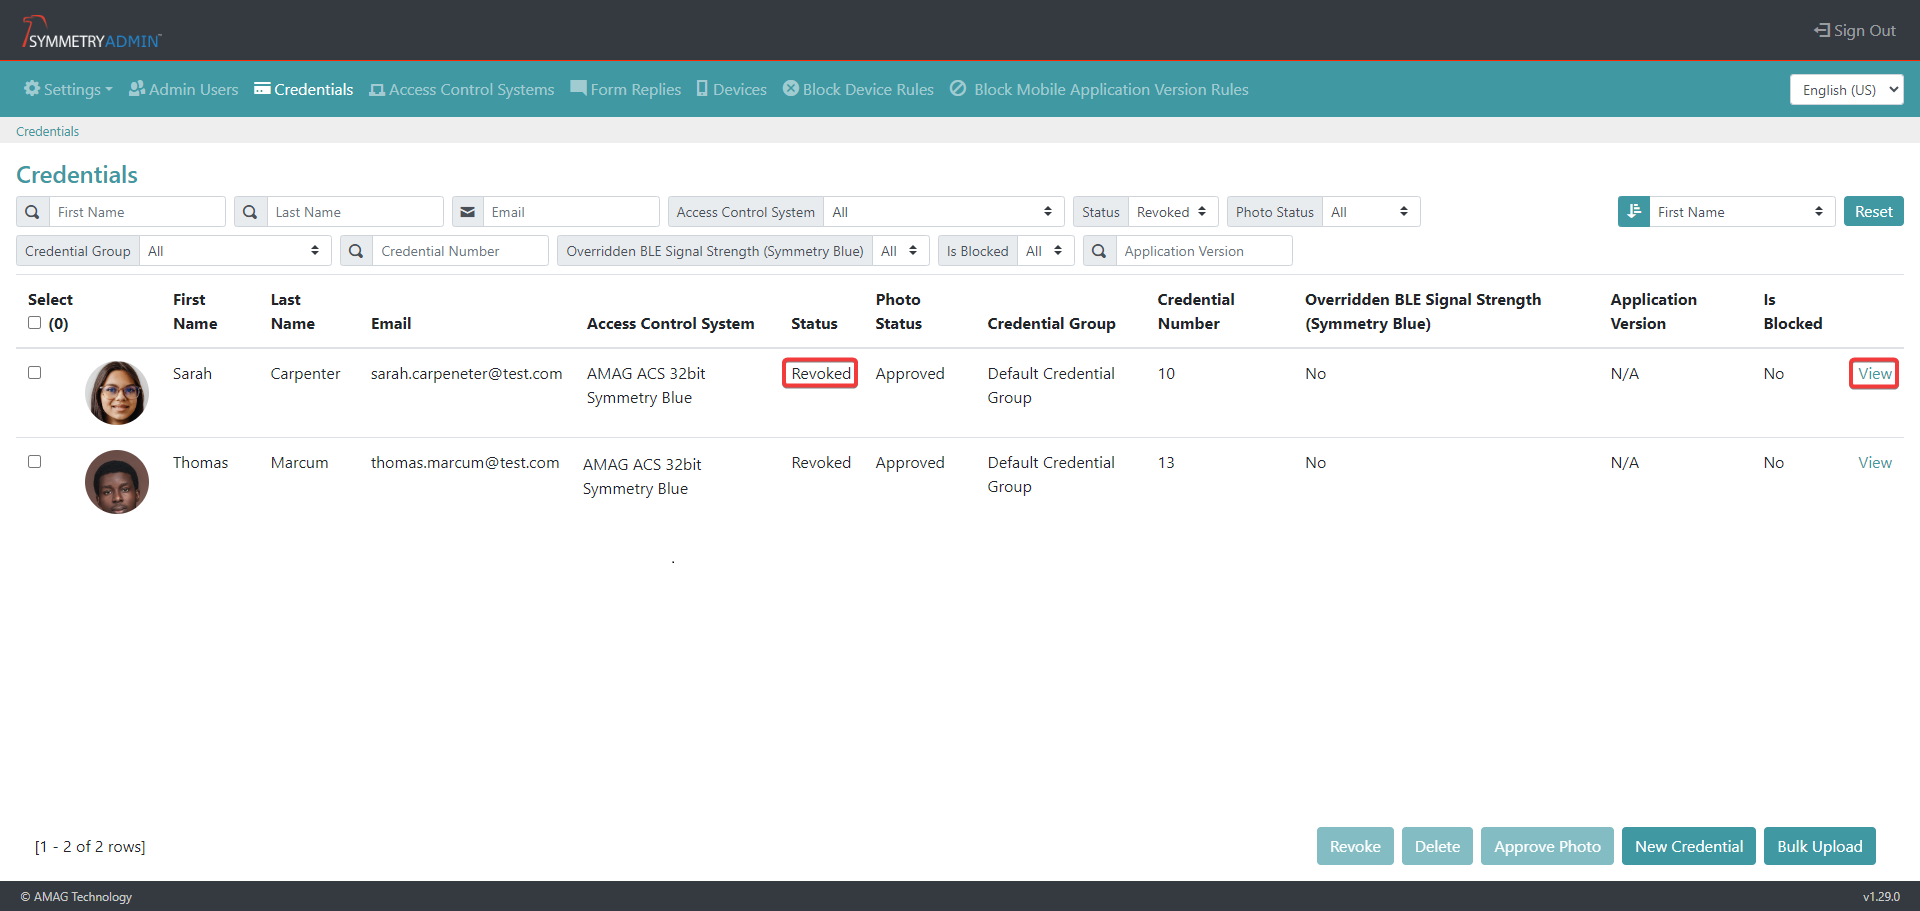
A revoked credential can be searched for by selecting Revoked as the search term in the Status search field. The status of the credential will be displayed as Revoked.

If the user requires the revoked credential to be activated. There is the option to Resend Credential. Click on the View button to enter the details page of the credential.
The user has the ability to Resend Credential, Edit or Delete the credential from this section.
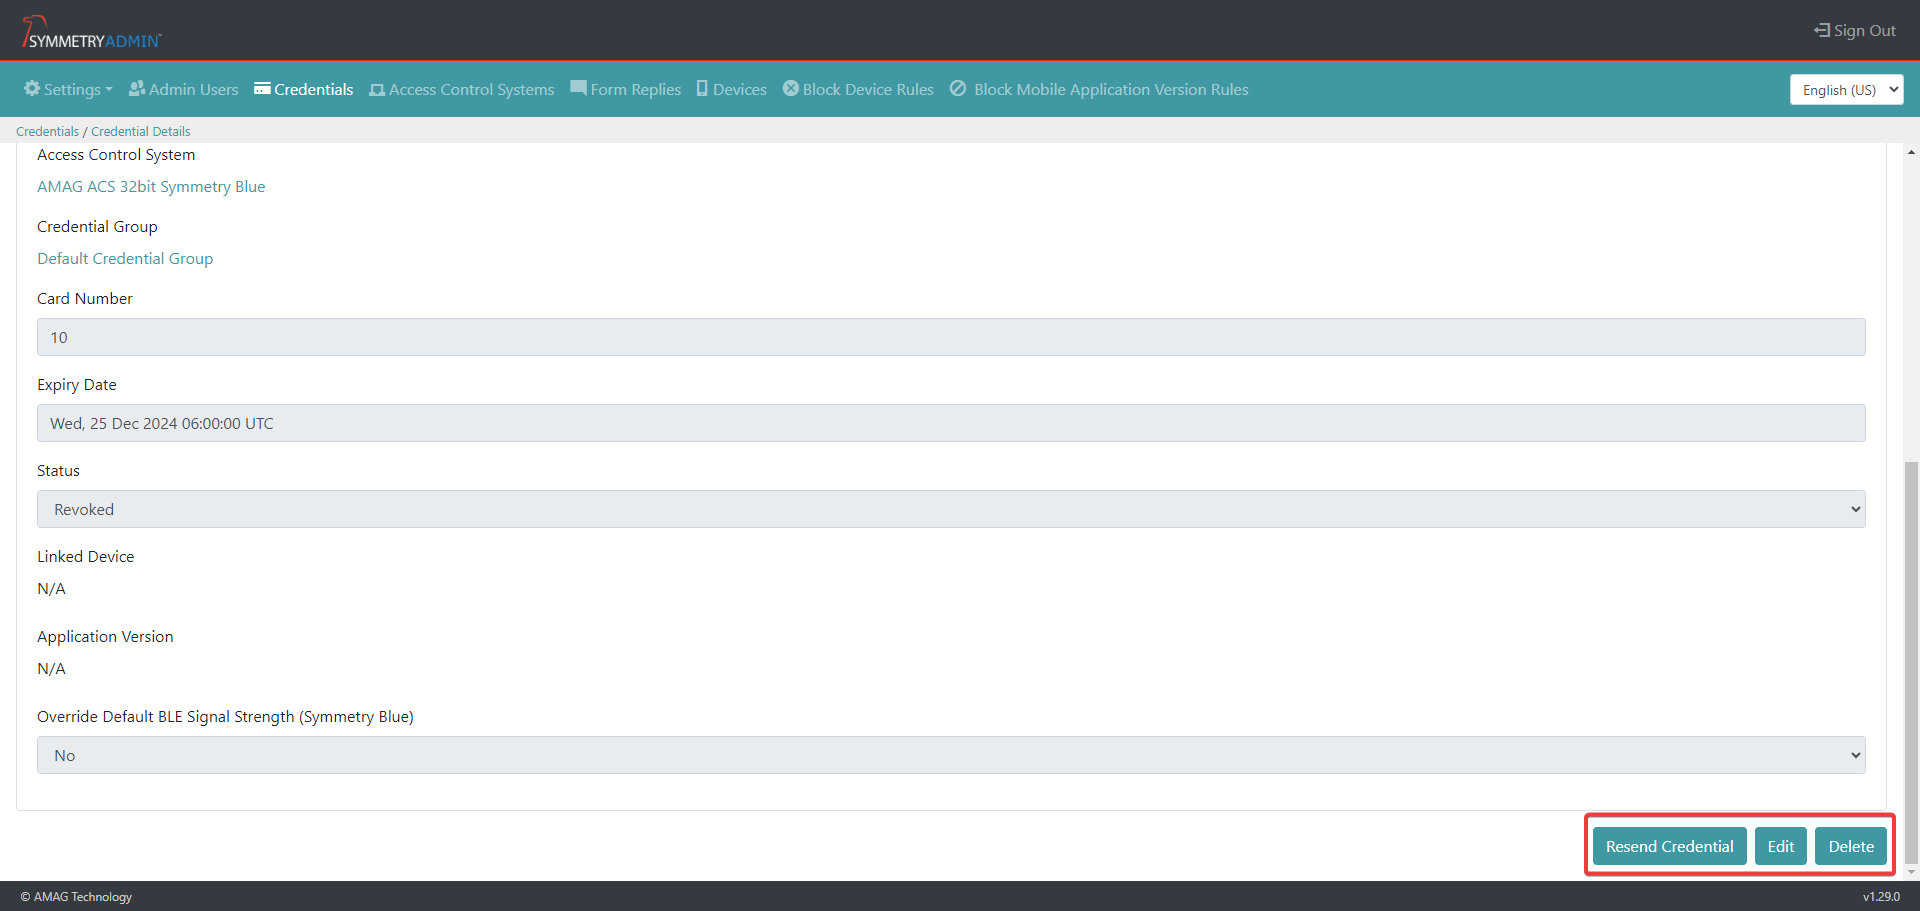
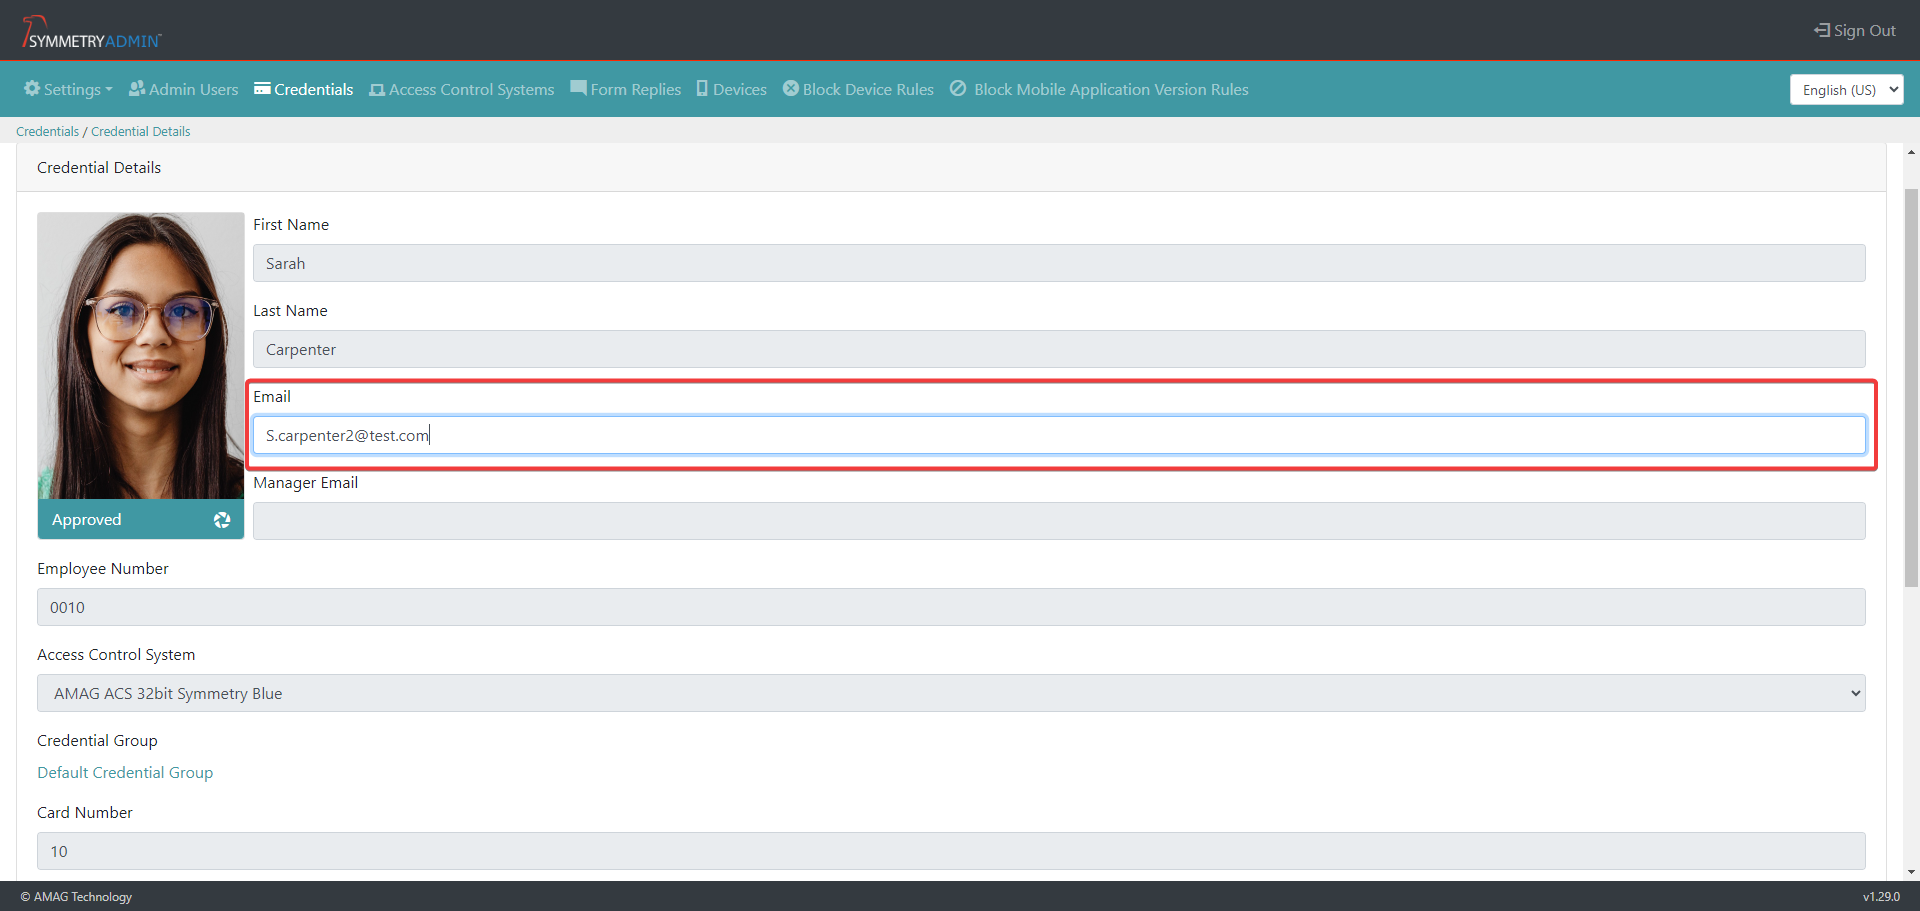
Clicking the Edit button will allow the user to edit the email address (and Issue Level of the credential if applicable) of the credential. If any changes are made, click the Save button to confirm the changes.
Clicking the Delete button will allow the user to delete the already revoked credential. A pop up message will appear. This message will provide the user with the details of the credentials that have been selected to be deleted. The user can either click the Delete button to approve the revoked credentials or click the Cancel button to cancel the deletion of the selected credentials.
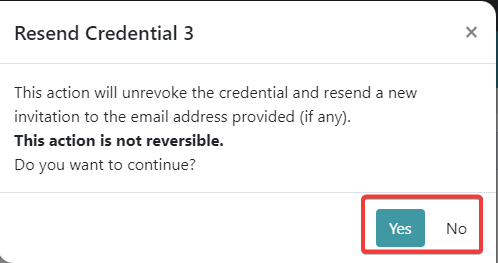
Clicking the Resend Credential will allow the credential to be unrevoked. If applicable a new invitation email will be sent to the email address provided. The user will be required to confirm the unrevoke action by clicking the Yes button. Or click the the No button to cancel the unrevoke action.
Click the Invitation QR Code button to allow the invitation QR code to be created.
Use the Symmetry Mobile App to Scan the displayed QR Code. Refer to Adding a New Credential section of this guide for further information.
Delete
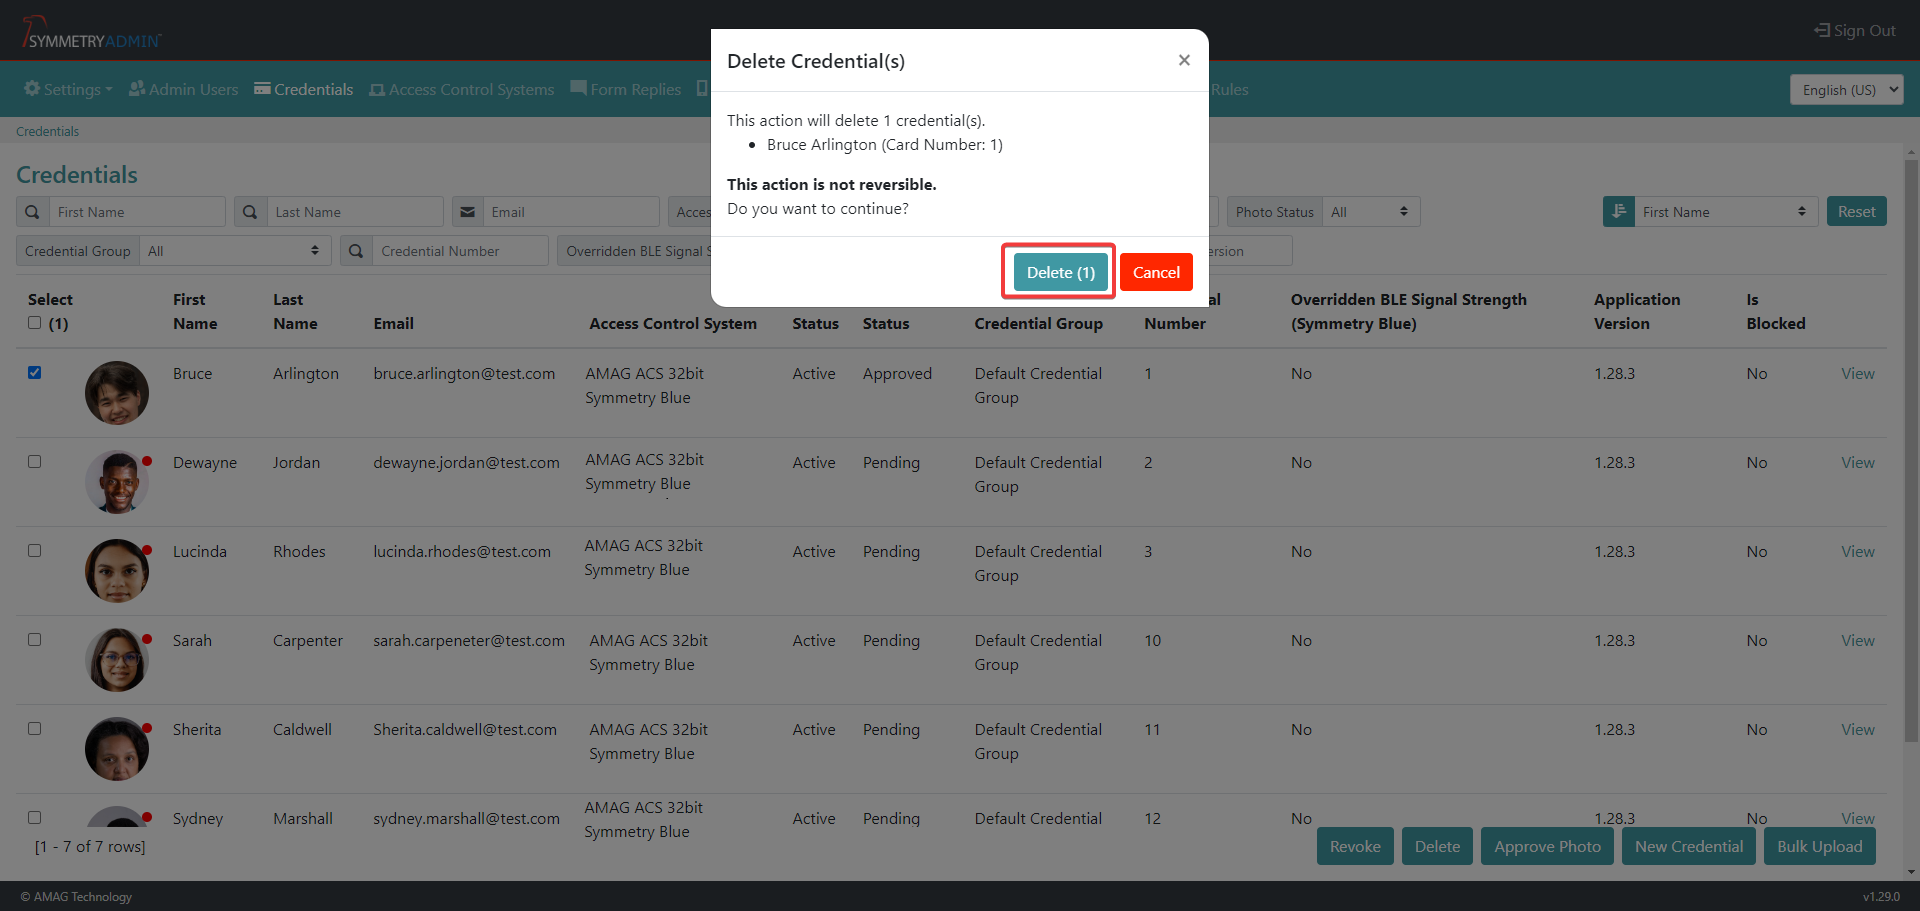
The user can select individual, multiple or all credentials to Delete. Once the credentials have been selected click on the Delete button.
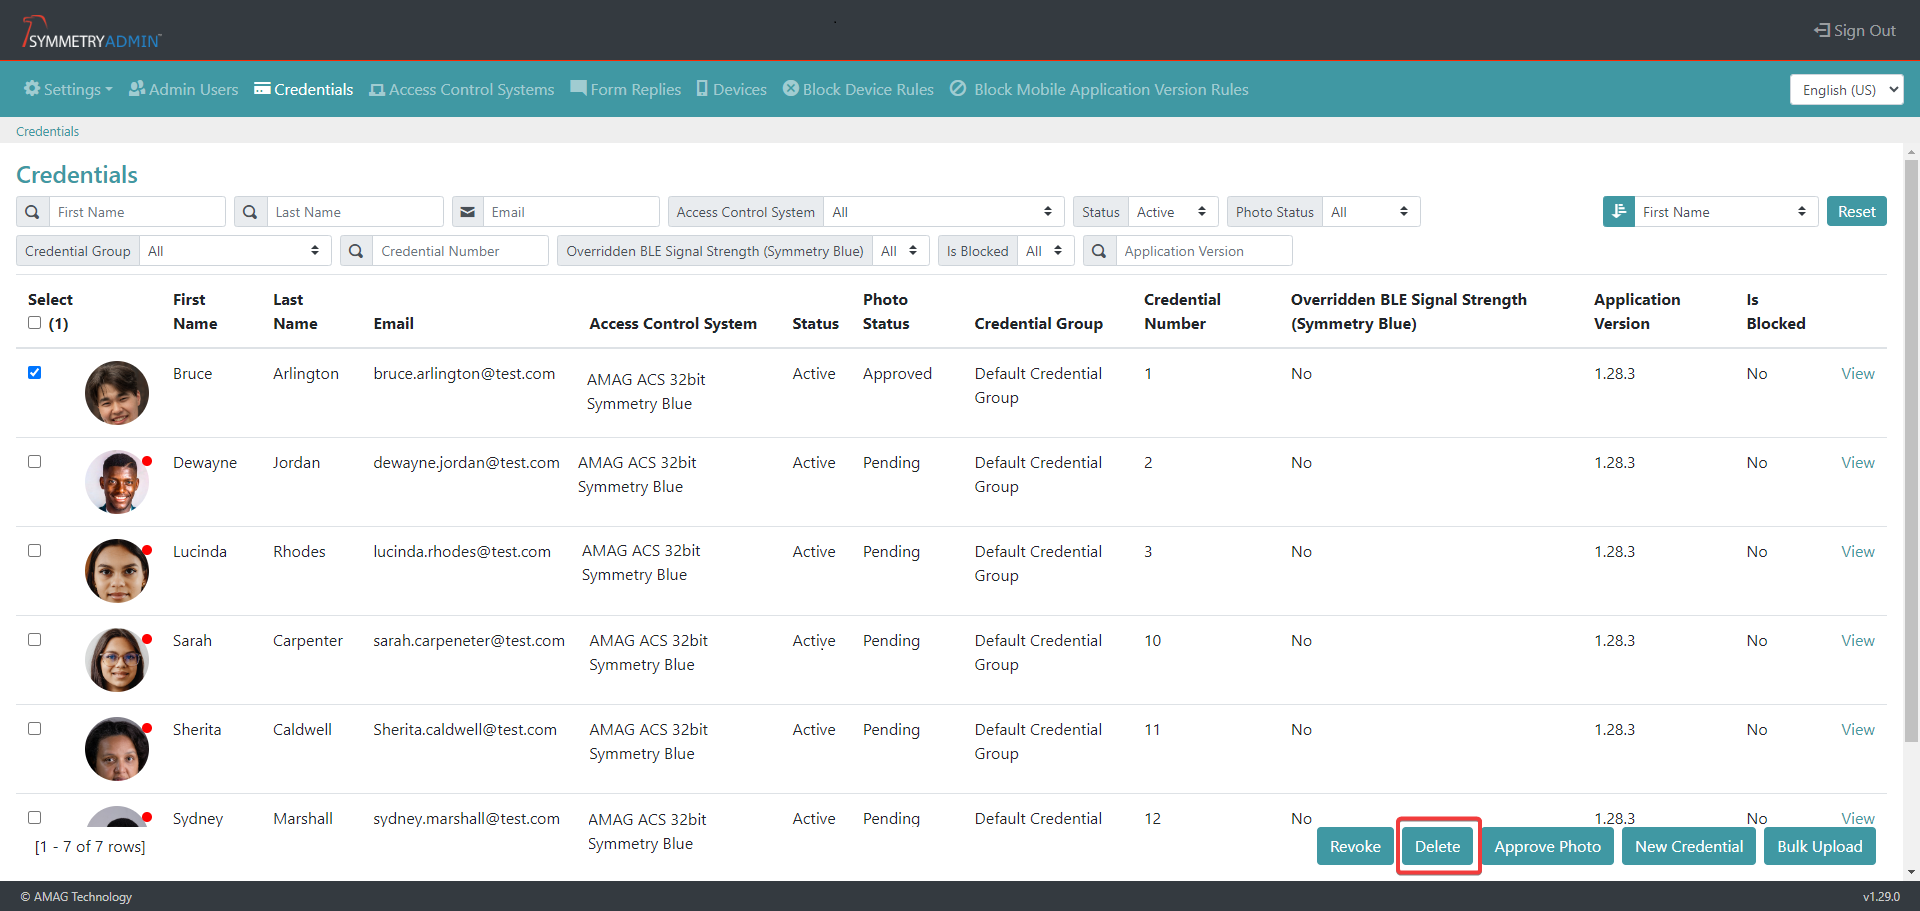
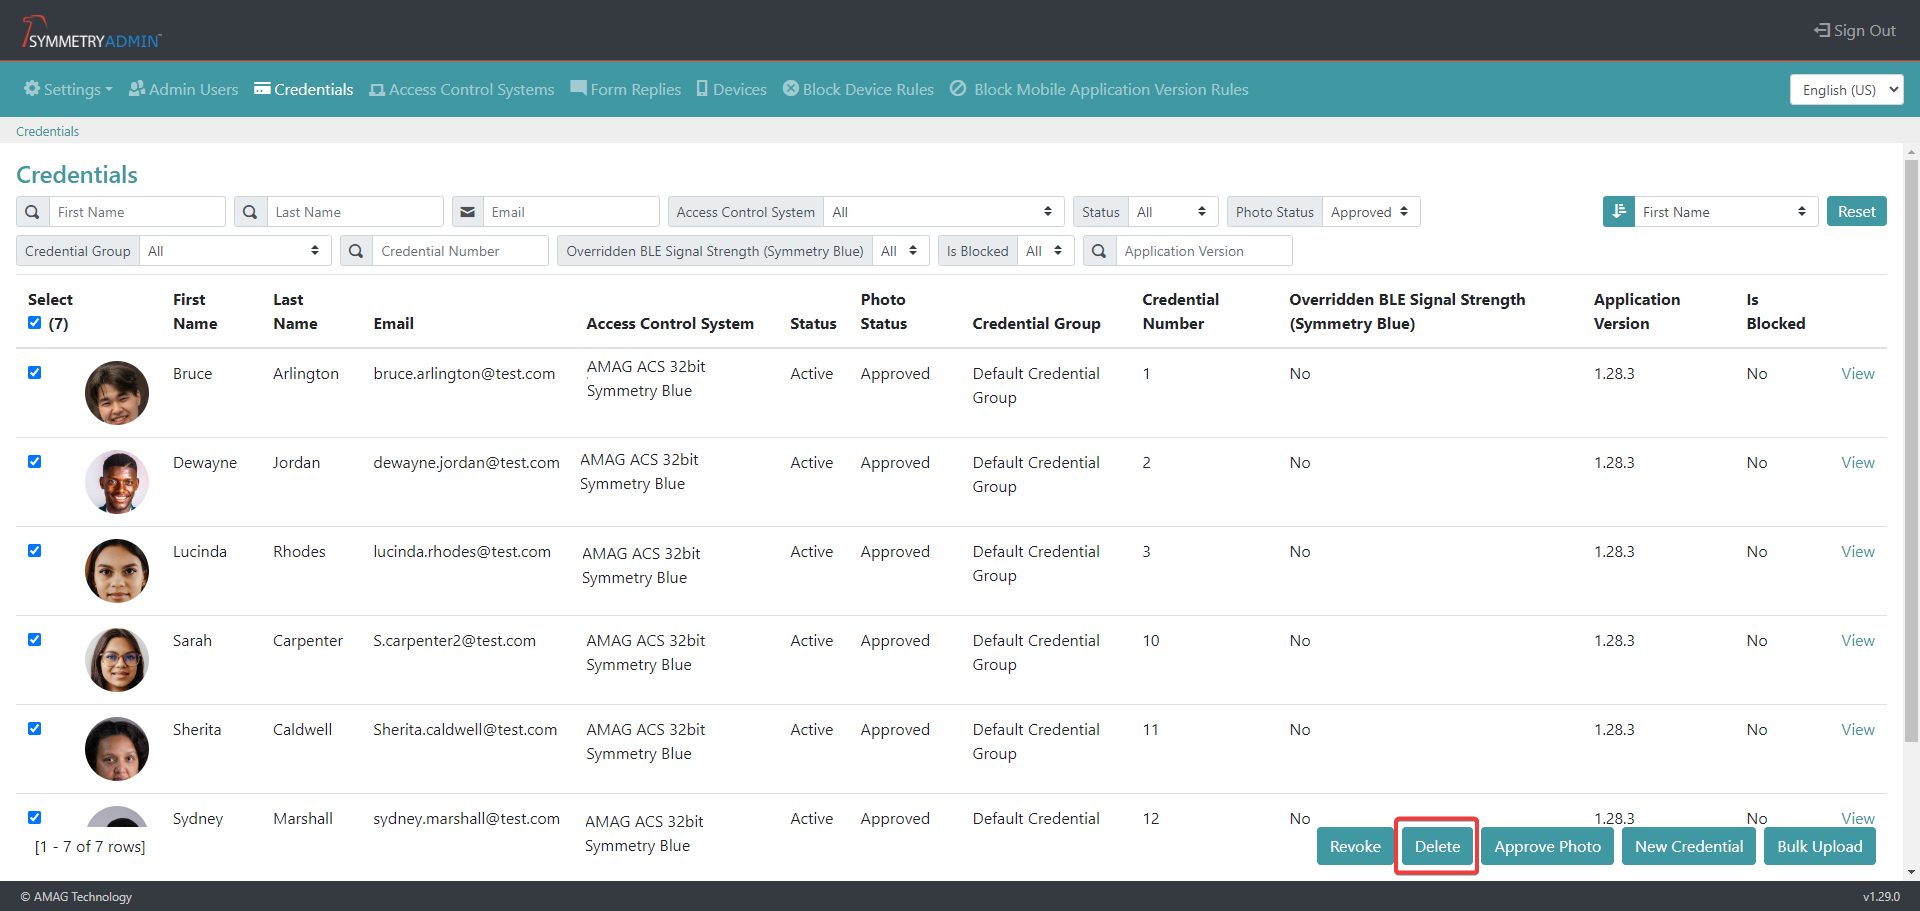
A pop up message will appear. This message will provide the user with the details of the credentials that have been selected to be revoked. The user can either click the Revoke button to approve the revoked credentials or click the Cancel button to cancel the revoke of the selected credentials.

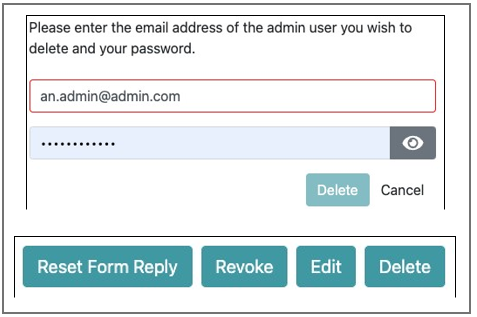
Soft Delete Credentials / Delete Admin Users: Users with the correct rights and permissions can delete admin users. The user will need to provide the email address of the admin user and their own password before confirming the action by clicking the Delete button. The user can also remove credential users from UI (User Interface), allowing the credential details to be reused.
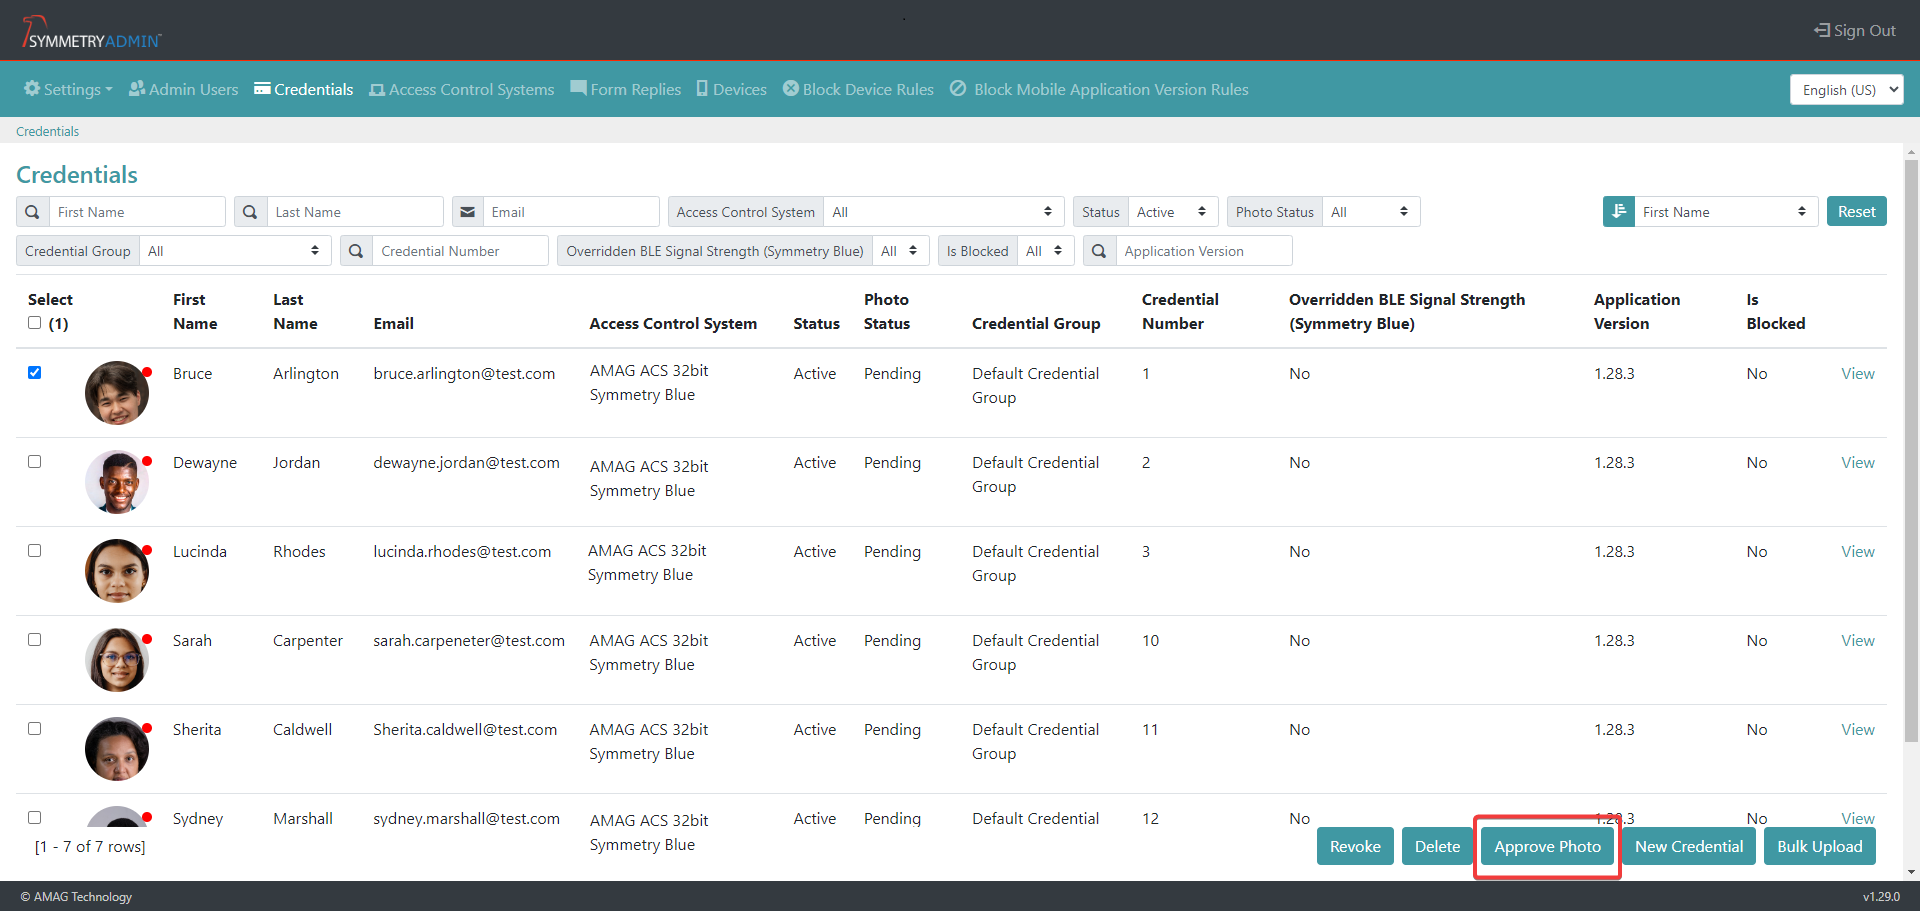
Approve Photo
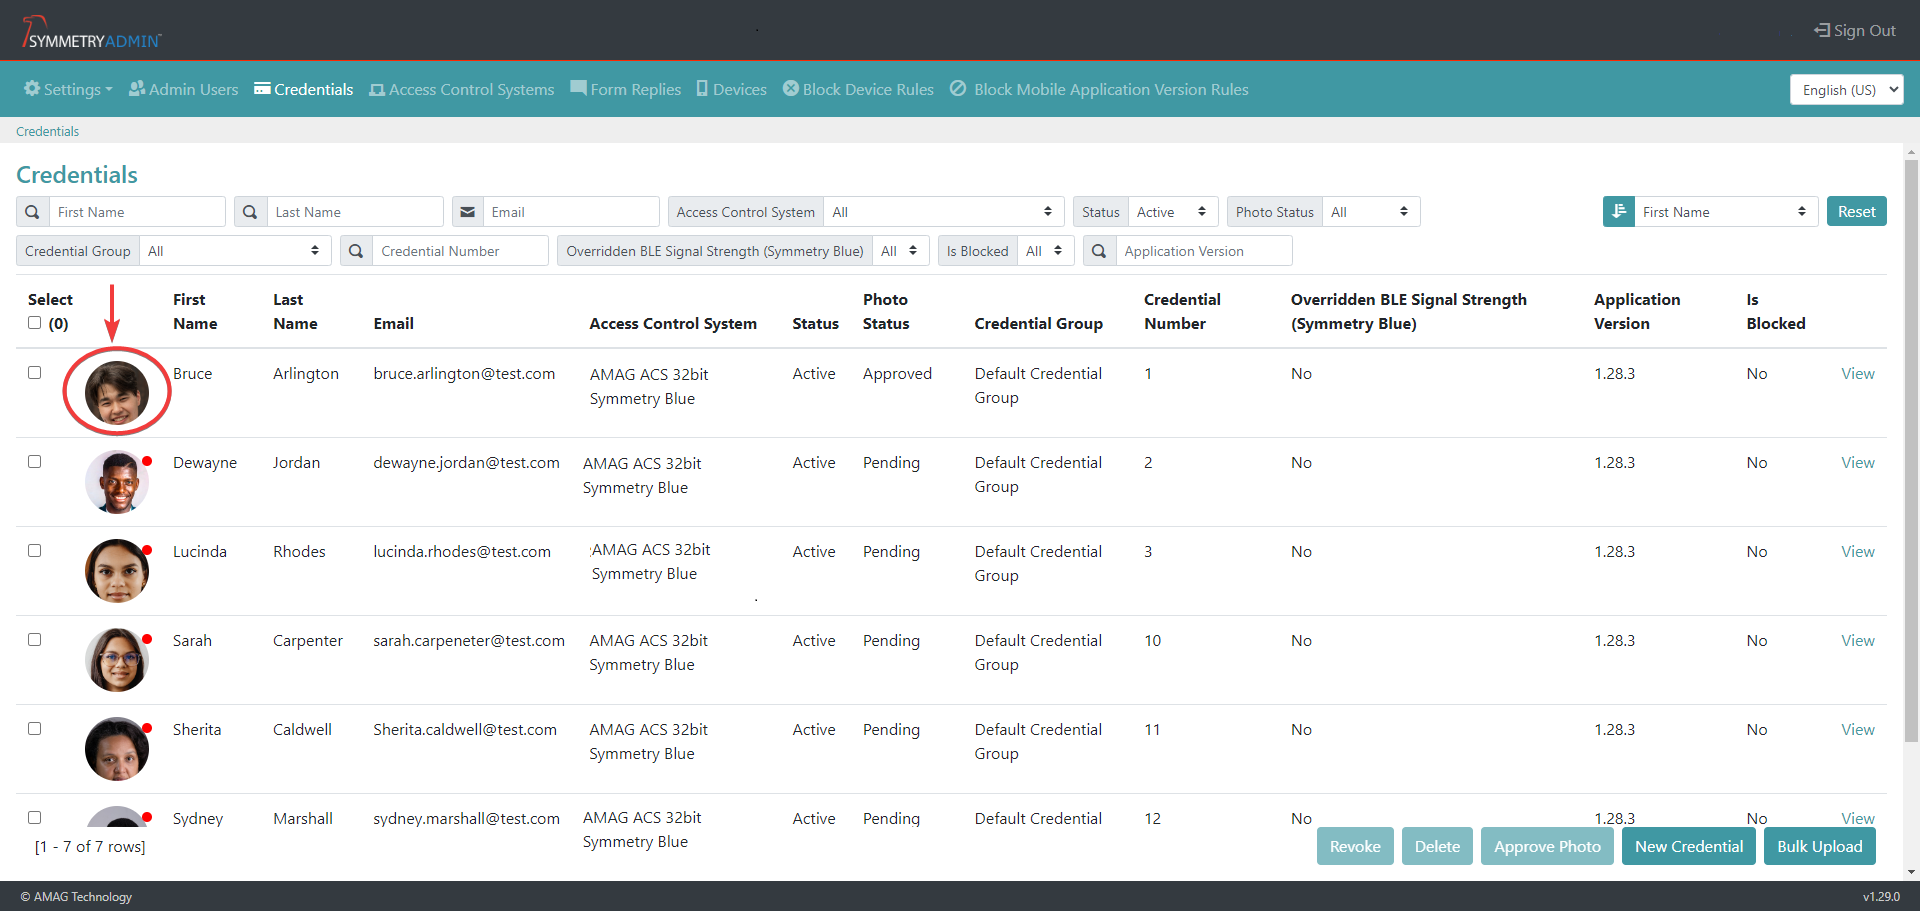
The user can quickly verify if a credential photo requires approval. A credential that has a photo that requires approval will be highlighted with a red dot next to the credential photo on the credentials home page. Credentials that have had the photo approved do not have any highlighted dots next to the credential details.
The user can select individual, multiple or all credentials to approve the photos. Once the credentials have been selected click on the Approve Photo button.
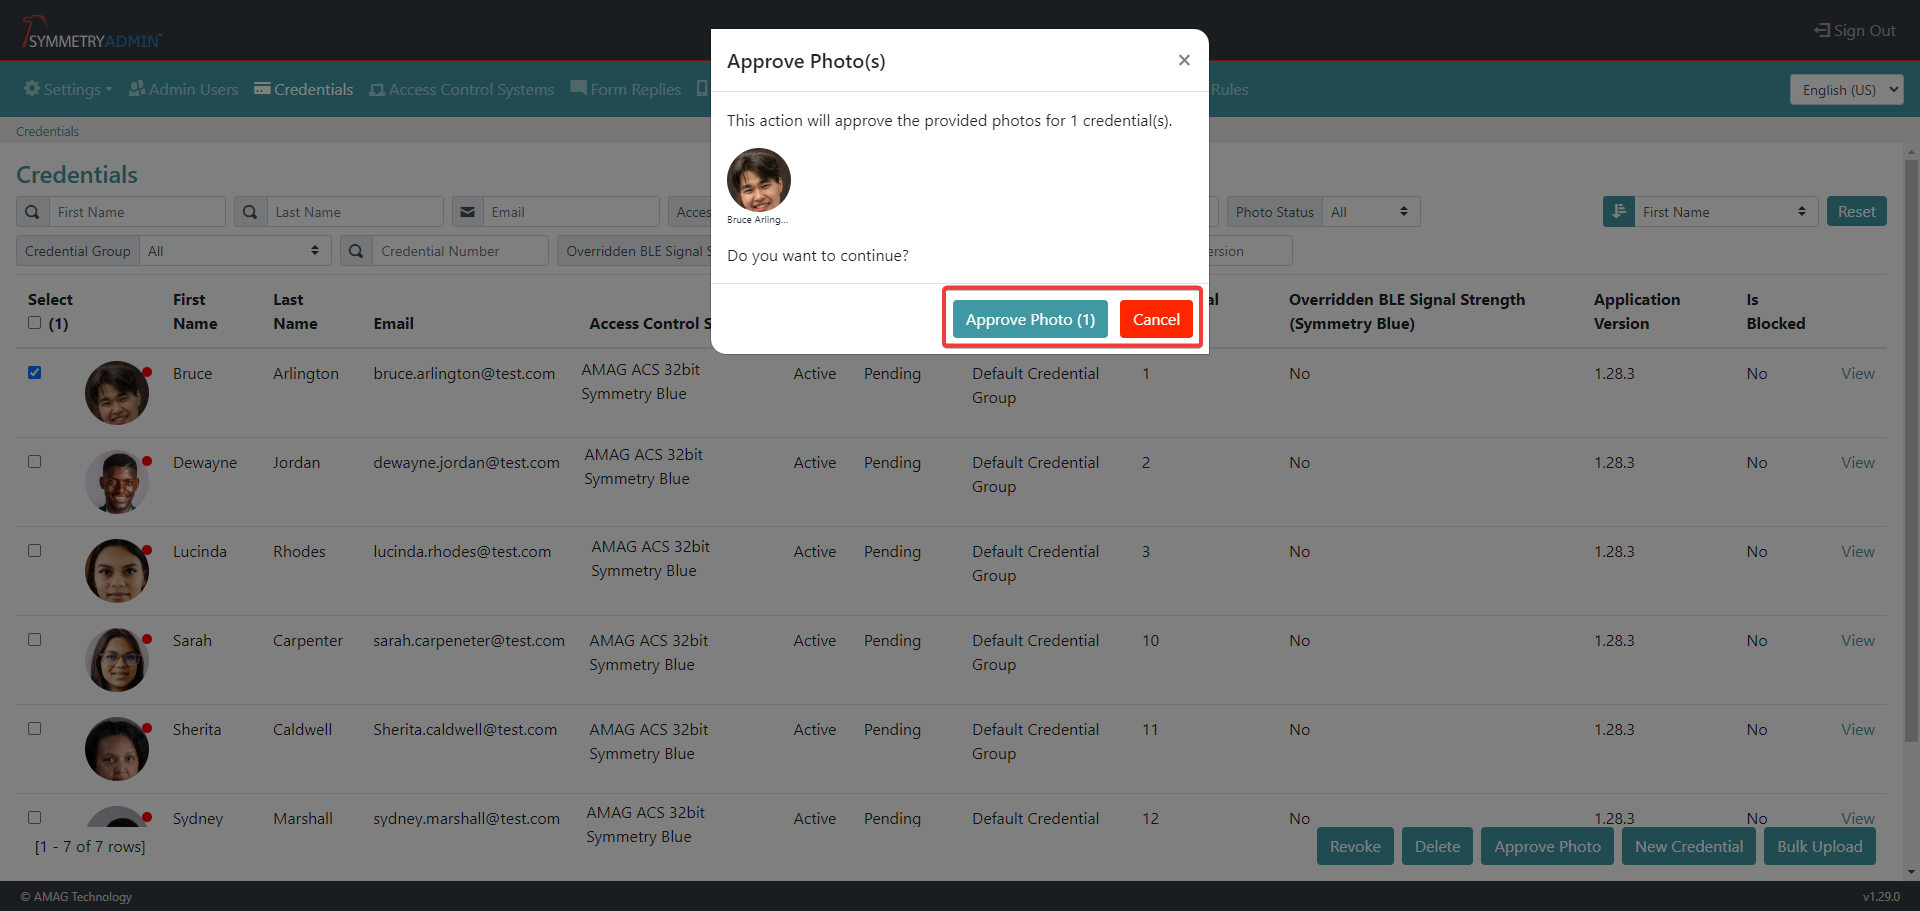
A pop up message will appear. The user can either click the Approve Photo button (for individual/single credential photo approvals) or click the Continue to Approve Photo button (if multiple credentials are selected) to continue to approve the credential photo. The user can also click the Cancel button to cancel the photo approval.
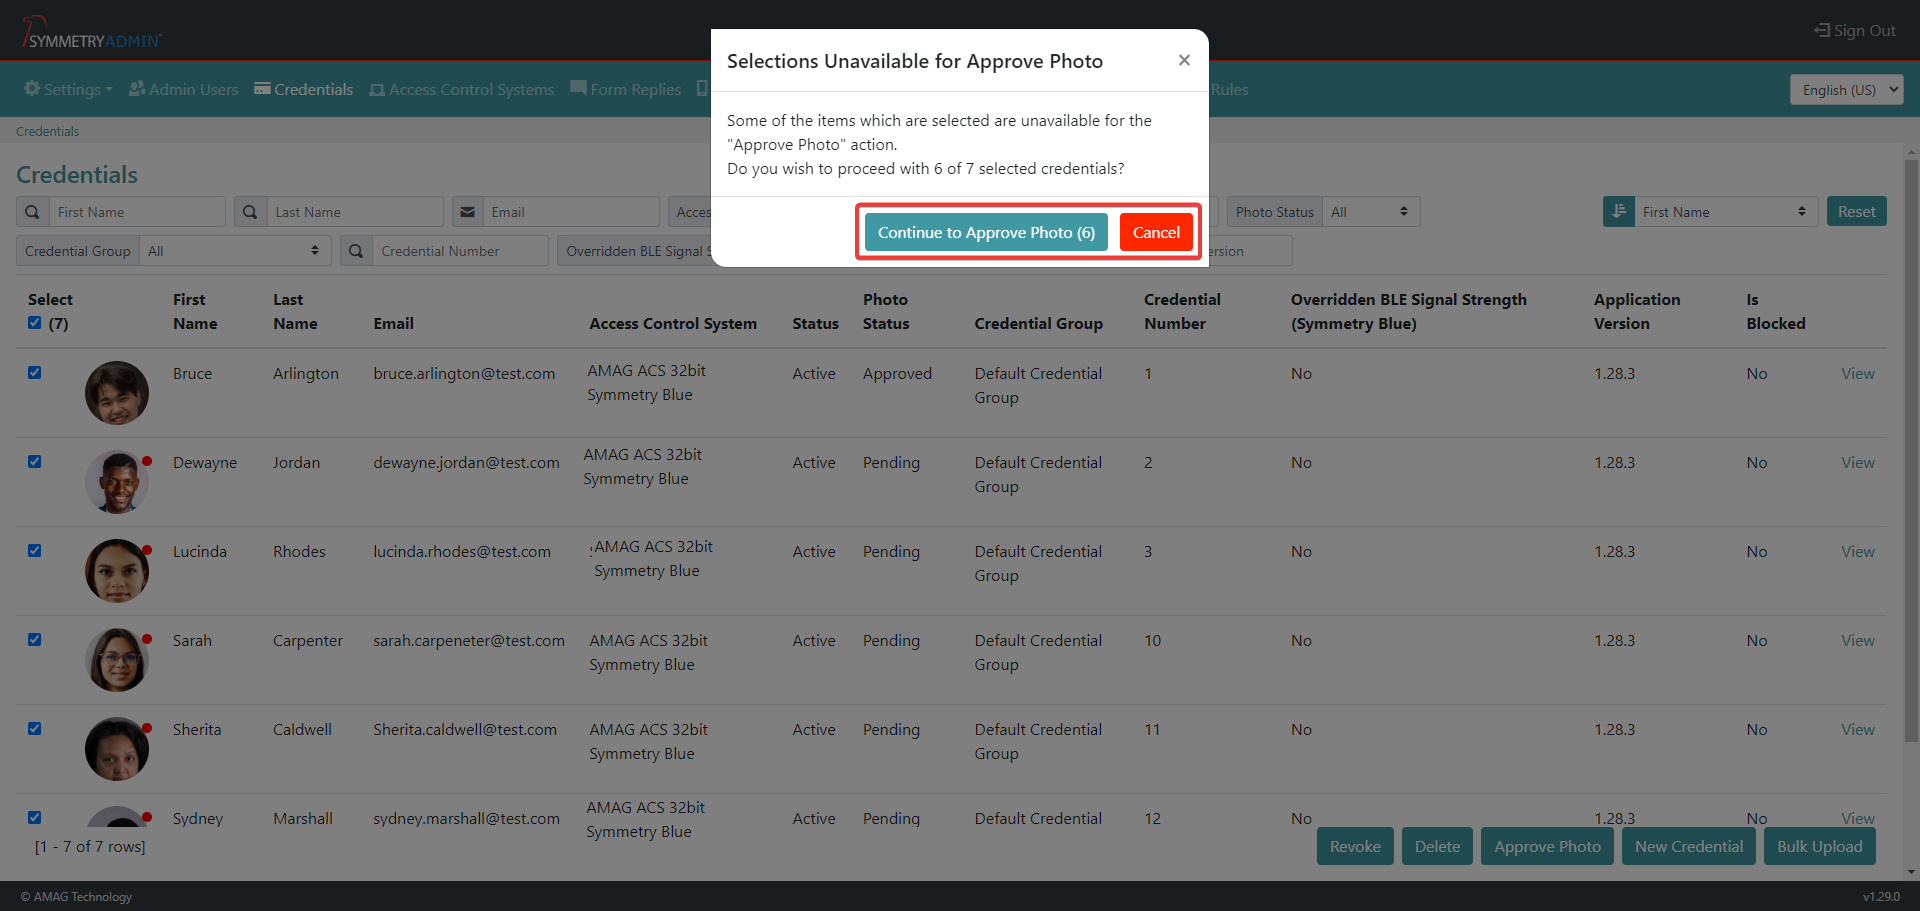
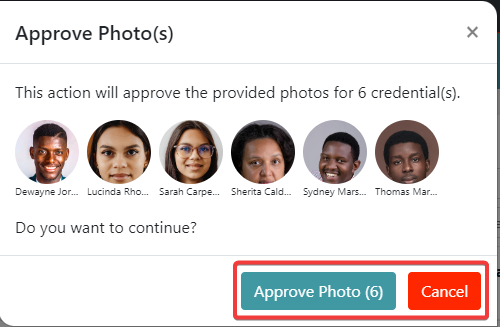
If multiple or all credentials have been selected the user then must confirm they approve the photos in the next step. A pop up message will appear. This message will provide the user with the details of the credentials that have been selected to have the photo approved. Click the Approve Photo button to approve the multiple or all credential photo approvals.
The status of credentials photos can be searched for by selecting the required status (pending, approved, rejected or no photo) as the search term in the Photo Status search field. This is helpful as it quickly allows the user to search for credentials that require the photo approval (pending) process to be completed.

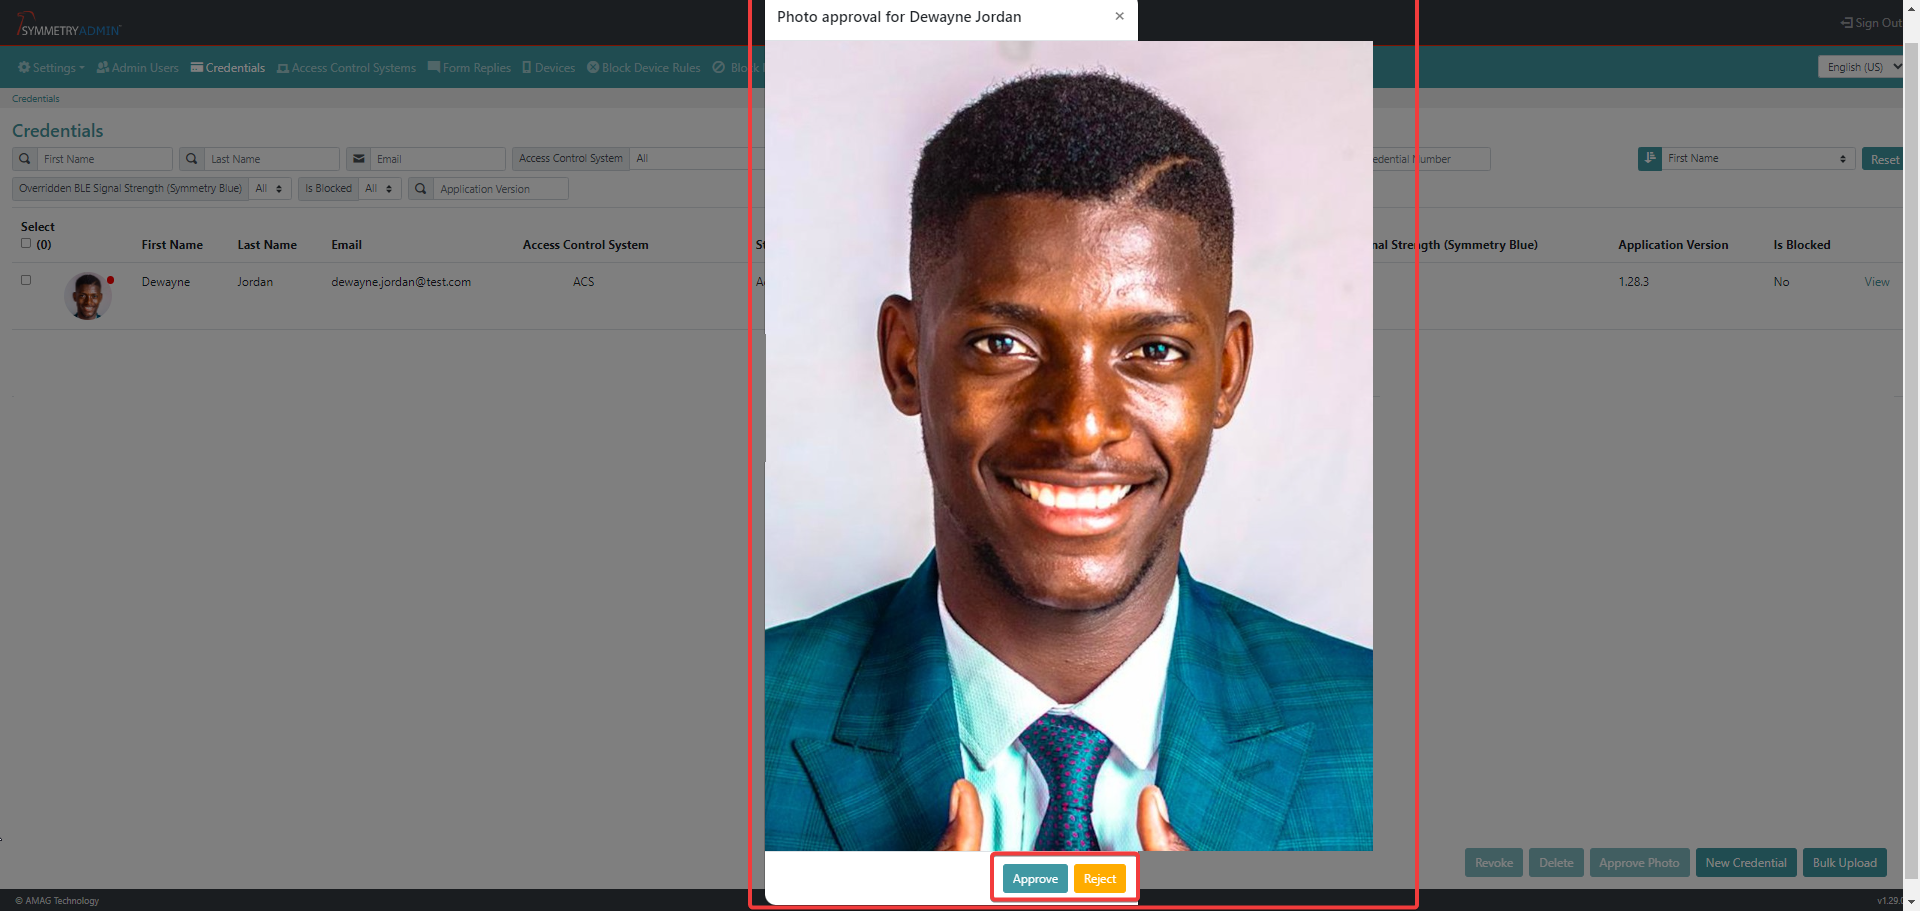
The user can also approve individual credential photos by clicking on the credential photo directly from the credentials home page.
A pop up will appear with the credential photo. The user can either click the Approve button to accept and approve the photo, or the Reject button to reject the photo and cancel the photo approval process.